Developer Guide

Table of Contents
Acknowledgements
We would like to acknowledge Address Book (Level-3) as we have referenced their User Guide (UG) and Developer Guide (DG) to structure our documentation.
Introduction
The aim of this guide is to provide a comprehensive explanation of the internal mechanisms of MoneyGoWhere. This will enable upcoming software engineers to acquire a detailed understanding of the application’s implementation, making it easier for them to work on the project.
For all sequence diagrams included in this guide, we will not include the interaction with the Parser and Router classes as it is implied that all inputs will first be parsed through them.
Back to table of contents
Design
Architecture Design
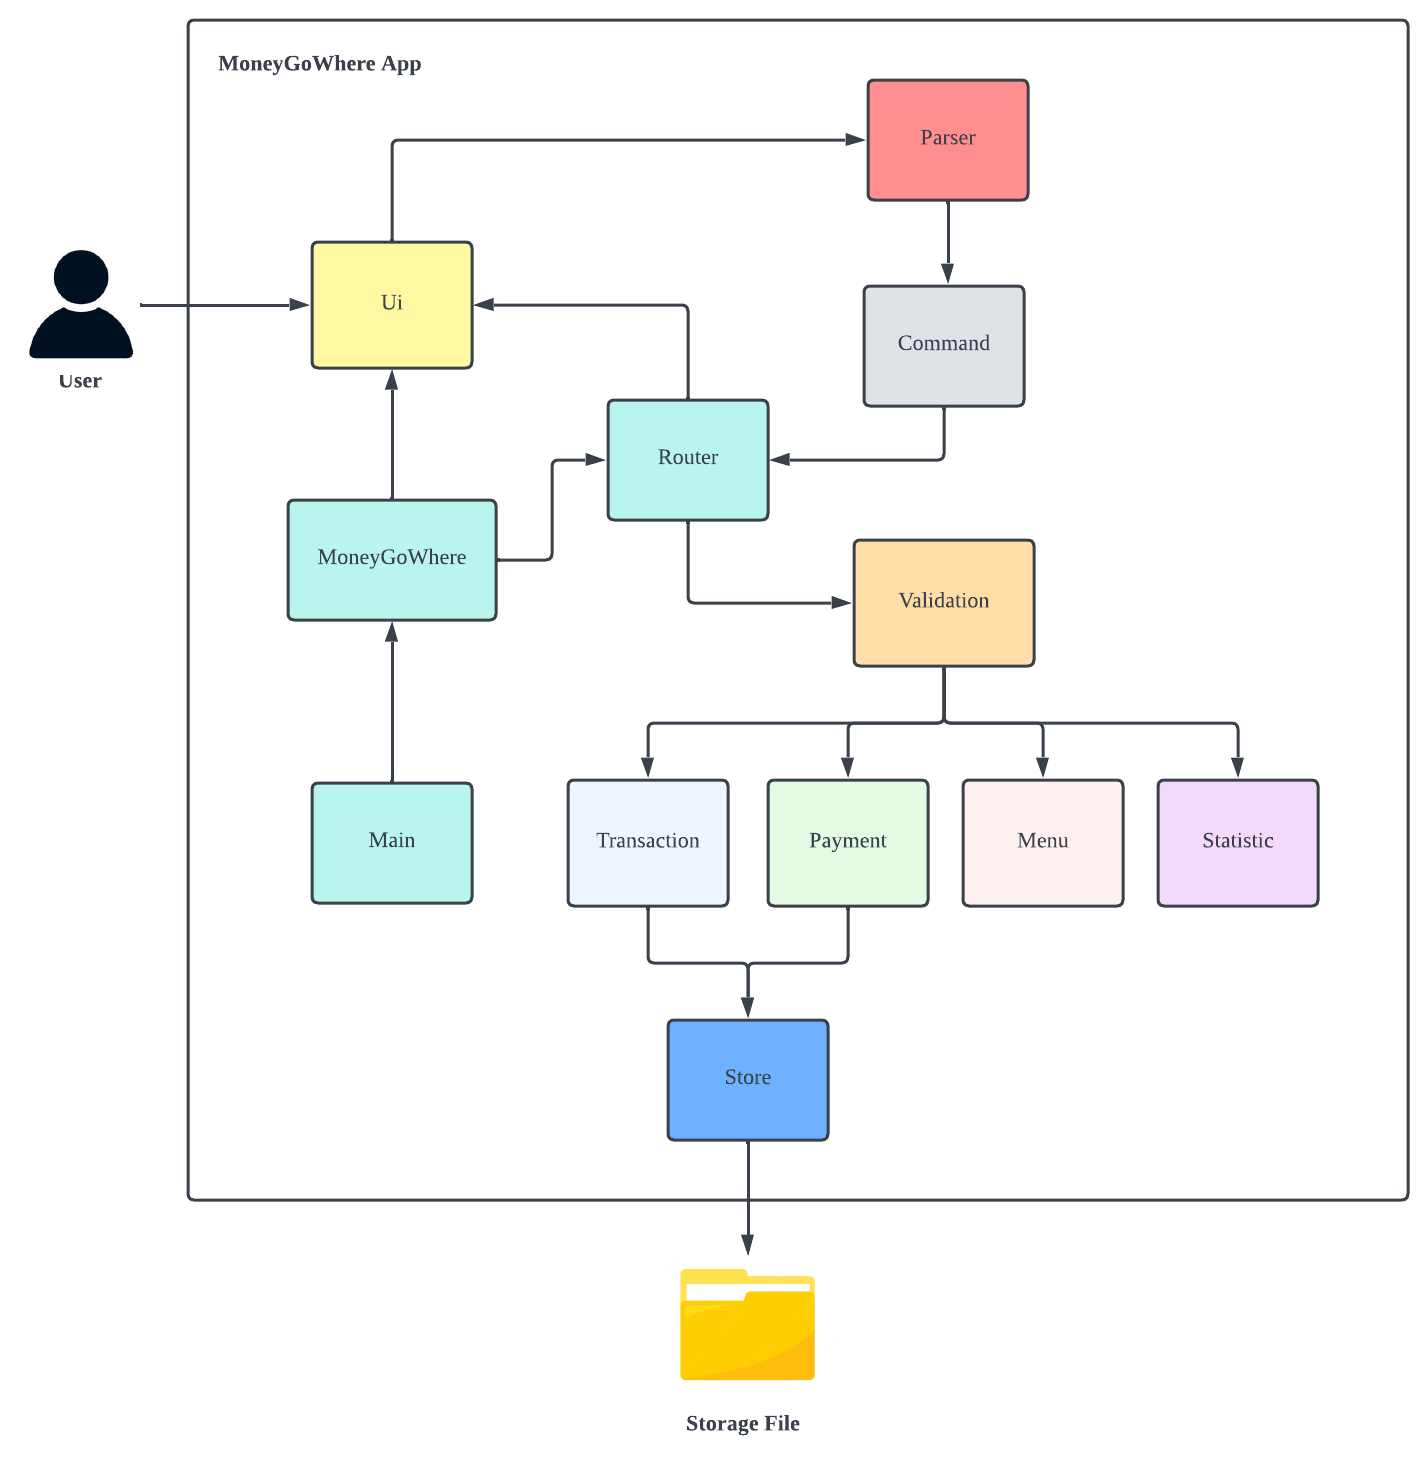
Figure 1: Architecture diagram to illustrate the high-level design of MoneyGoWhere application.
Overview of components
Main
- Upon app launch, its sole purpose is to create an instance of
MoneyGoWhere.
MoneyGoWhere
- Upon creation, it initialises and loads
MenuandTransactionfrom storage and caches them. - On run, it initialises
UiandRouterand runs the following in a loop:Uireceives user input and usesCommandto format the input so that it can be understood by the application.- The
Commandis then passed to theRouterfor further processing.
- Handles the process of obtaining user input and presenting the application’s output to the user.
- Handles the process of formatting user input for the
Command. - Handles the formatting of the
MenuandTransactioncomponents for theStore.
Command
- Work closely with
Parserto ensure that user input is accurately formatted. - Stores the necessary information in a comprehensible format that can be readily utilised across the application.
Router
- Given the
Command, it identifies the appropriate function to execute.
Validation
- Oversees the validation process of the components within
Transaction,Menu,Payment, orStatistic, ensuring that user input aligns with our requirements.
Transaction
- Maintain a list of orders and its corresponding details.
- Any changes made to the list will be saved to the file defined by
Store. More elaboration is provided in later sections.
Menu
- Maintain a list of items and its corresponding details
- Any changes made to the list will be saved to the file defined by
Store. More elaboration is provided in later sections.
Payment
- Handles every payment and refund process for every new and existing orders in
Transaction.
Statistic
- This component uses the data in
Transactionto generate the relevant performance report for the user to analyse.
Store
- Handles the storage operation of the application.
Back to table of contents
MoneyGoWhere Component
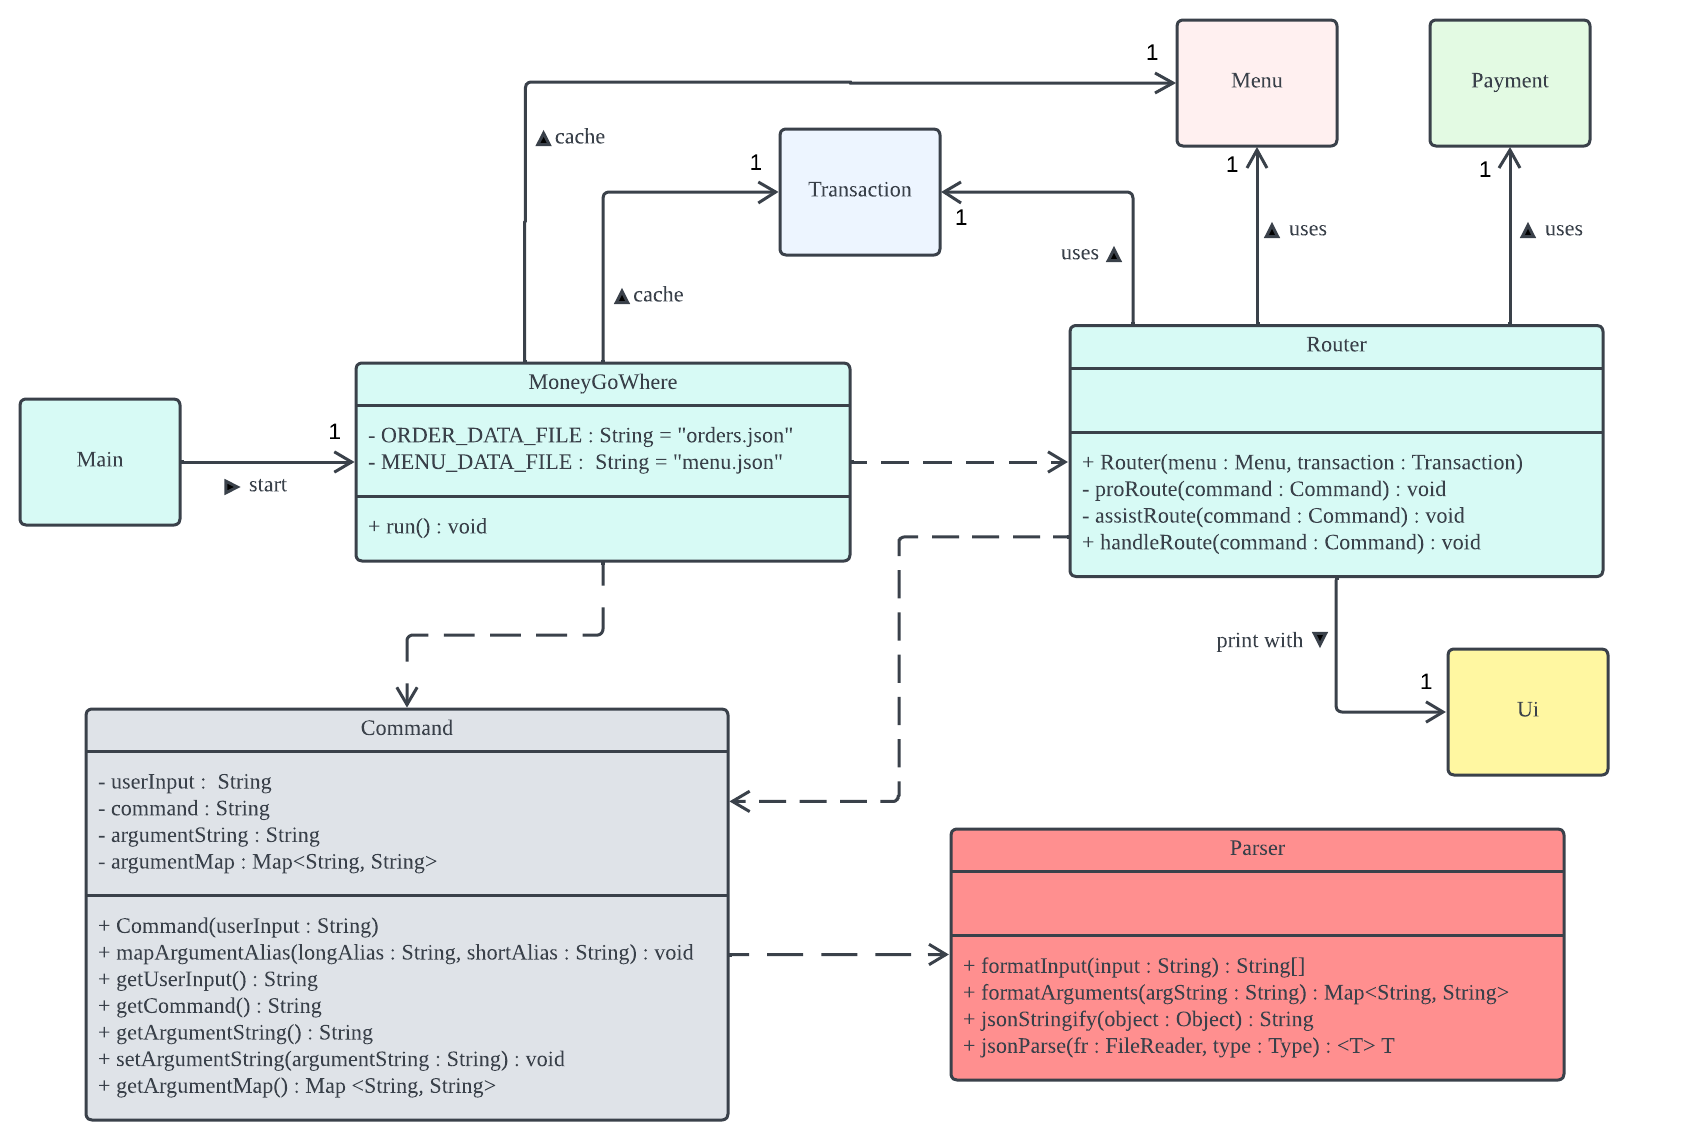
Figure 2: Class diagram for MoneyGoWhere component
MoneyGoWhere is initialised by the Main class and has a series of jobs to perform.
First, it initialises and maintains the instance of Menu and Transaction objects.
After initialisation, it will proceed to run a loop which prompts the user for their input. When it receives an input
from the user, it will invoke Command to stores the information in a comprehensible format.
The Parser is a helper class that assists the Command object to extract and format the relevant
information from the given user input.
After the Command object has been successfully parsed, it will be handed over to Router to determine which methods
to run.
If MoneyGoWhere detects that the user entered the command exit, the application will terminate the loop.
Menu Component
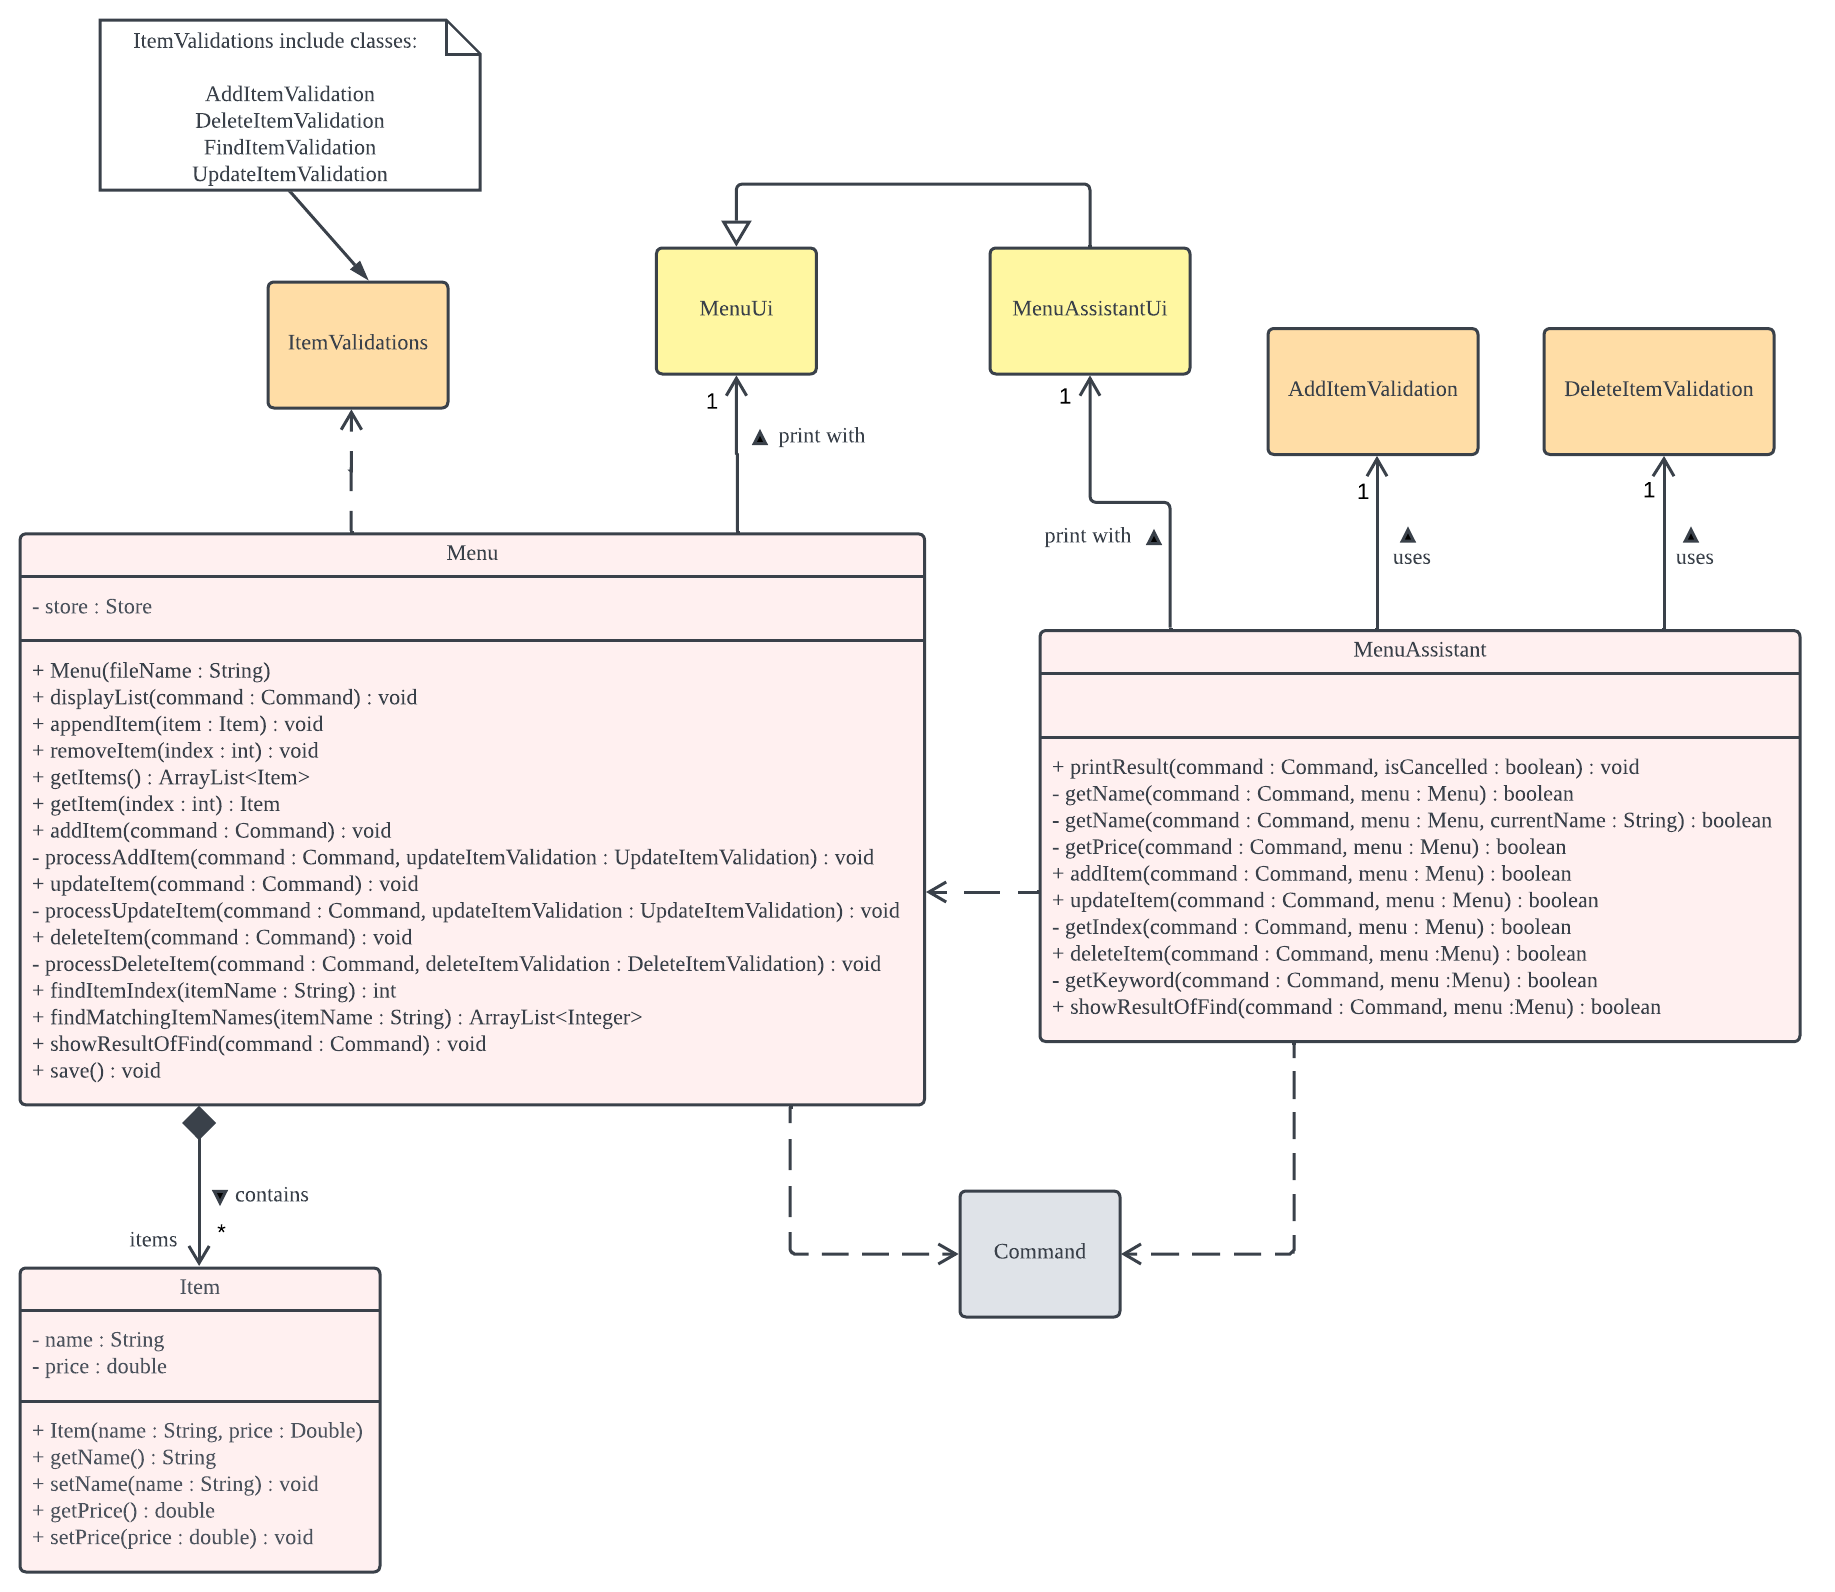
Figure 3: Class diagram for Menu component
The Menu component is a crucial part of MoneyGoWhere, responsible for managing and accessing all data related to
menu commands.
Whenever a menu command is entered, the Router in the MoneyGoWhere component will pass the Command object to
the Menu component for further processing.
The Menu component comprises 3 main classes: Menu, Item, and MenuAssistant.
The Item class represents a specific menu item created by the user, containing its name and price.
The Menu class is a handy container that keeps track of all Item objects created by the user. It offers convenient
methods to modify the list of items and manipulate the corresponding Item objects.
In addition to managing and accessing all data related to menu commands, the Menu class also ensures that all values
passed to its corresponding methods are valid, by utilising the Validation component.
The MenuAssistant class offers a user-friendly interface for the user to interact with the items in the Menu object.
It makes use of the MenuAssistantUi class to provide an intuitive and guided way for users to manage their menu.
Transaction Component
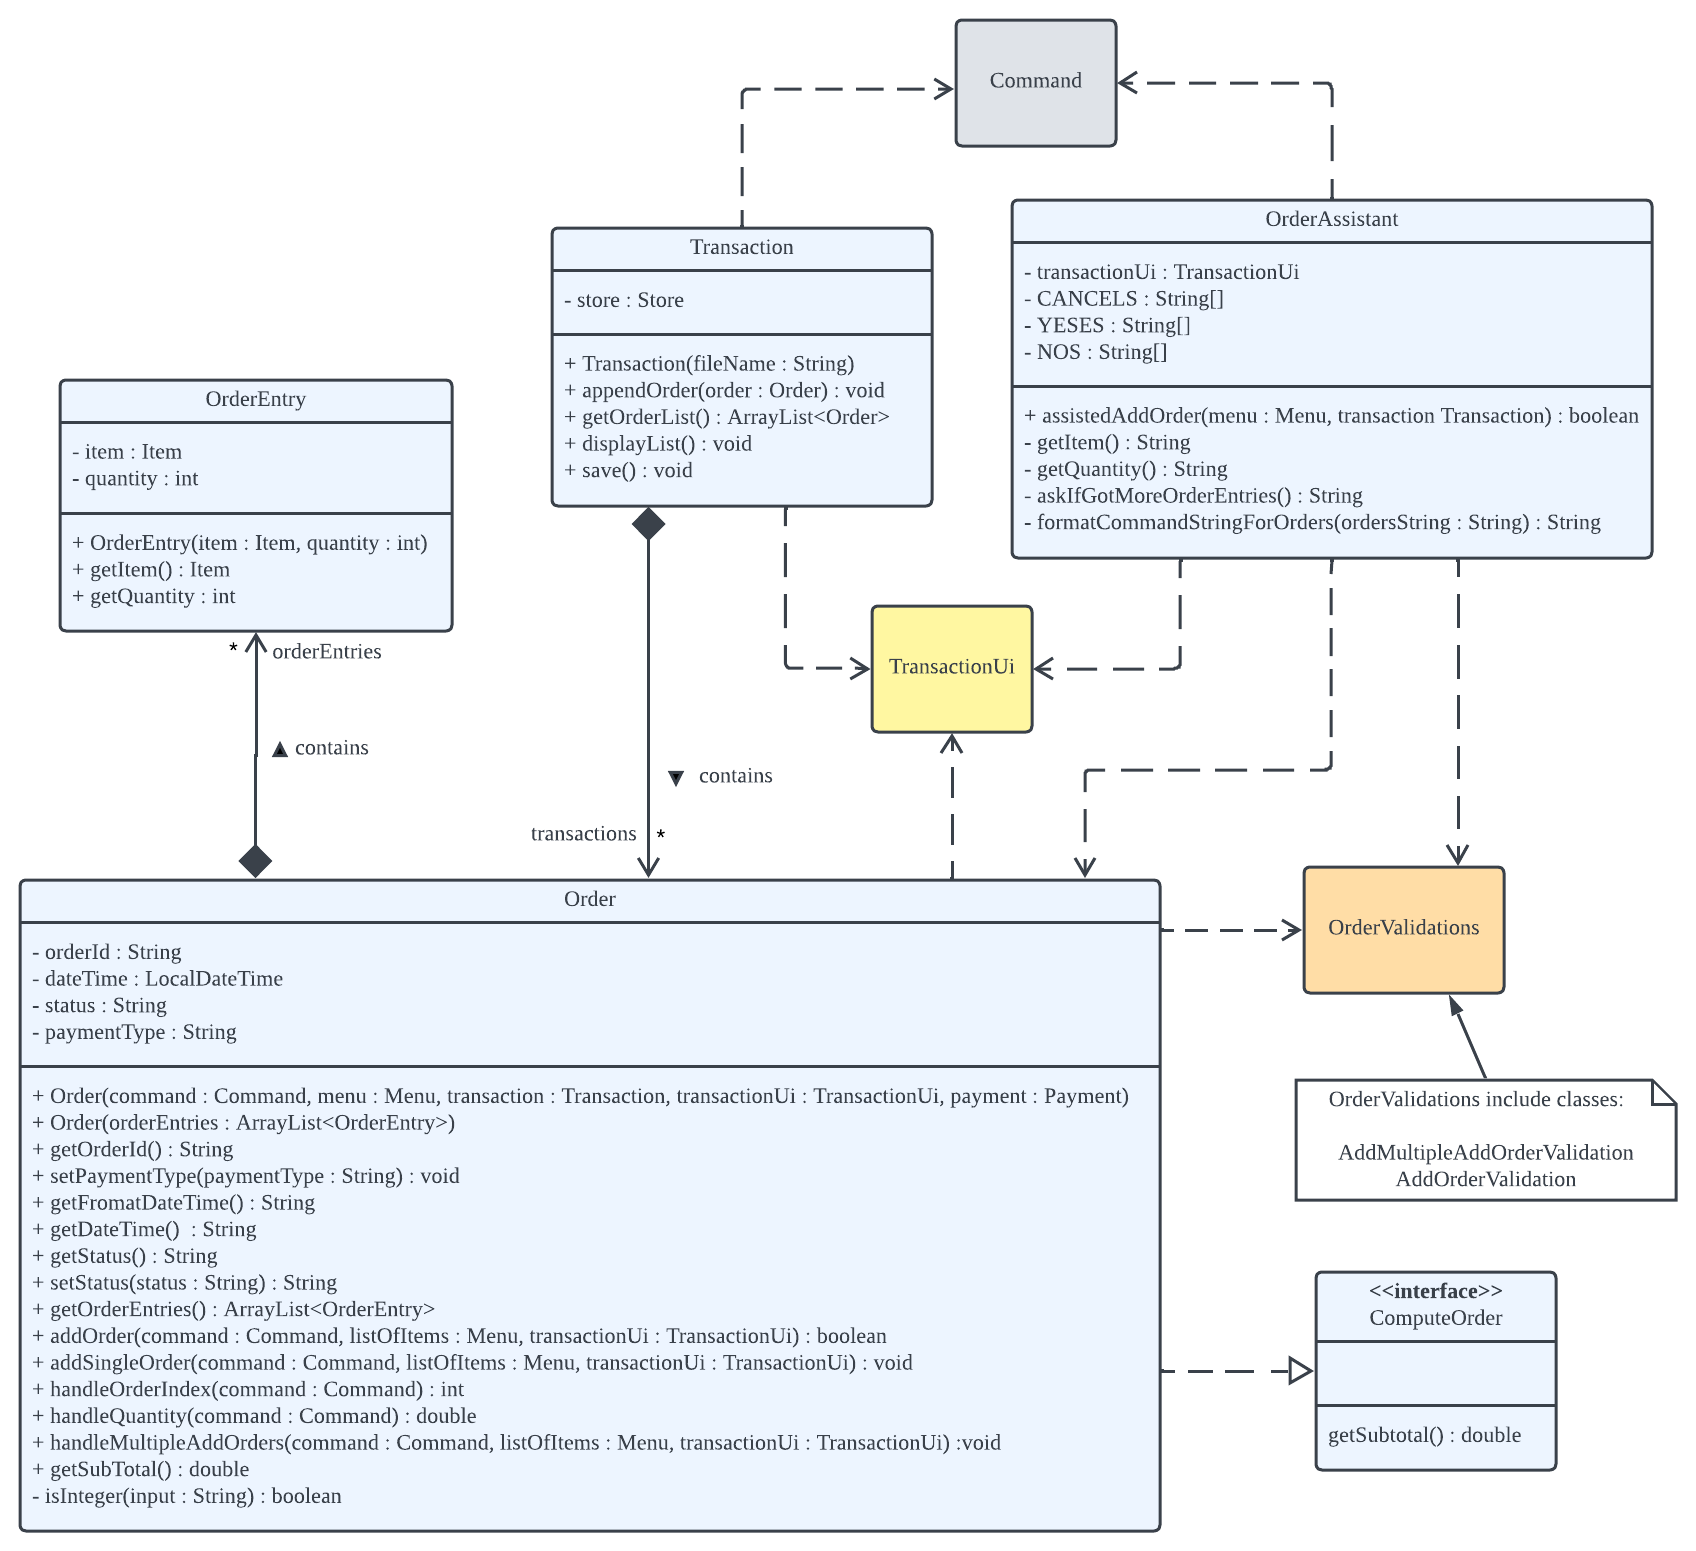
Figure 4: Class diagram for Transaction component
The Transaction component is another crucial part of MoneyGoWhere, responsible for managing and accessing all data
related to order commands.
Whenever a order command is entered, the Router in the MoneyGoWhere component will pass the Command object to
the Transaction component for further processing.
The Transaction component comprises 4 classes: Transaction, Order, OrderEntry and OrderAssistant.
Additionally, this component also has an interface: ComputeOrder.
The OrderEntry class represents an item in the menu and the corresponding quantity entered by the user.
The Order class serves as a data structure that contains a list of OrderEntry objects along with information such as
order id, date, time and status. It also calculates the subtotal using the ComputeOrder interface.
The Transaction class acts as a container, tracking all Order objects generated by the user, and providing methods
to add new orders to the Order list.
The Validation component is utilised by the Transaction class to ensure the validity of all values passed to its
methods.
The OrderAssistant class offers a user-friendly interface for the user to add new orders to the Transaction object,
leveraging the TransactionUi class to offer an intuitive and guided experience for users.
Payment Component
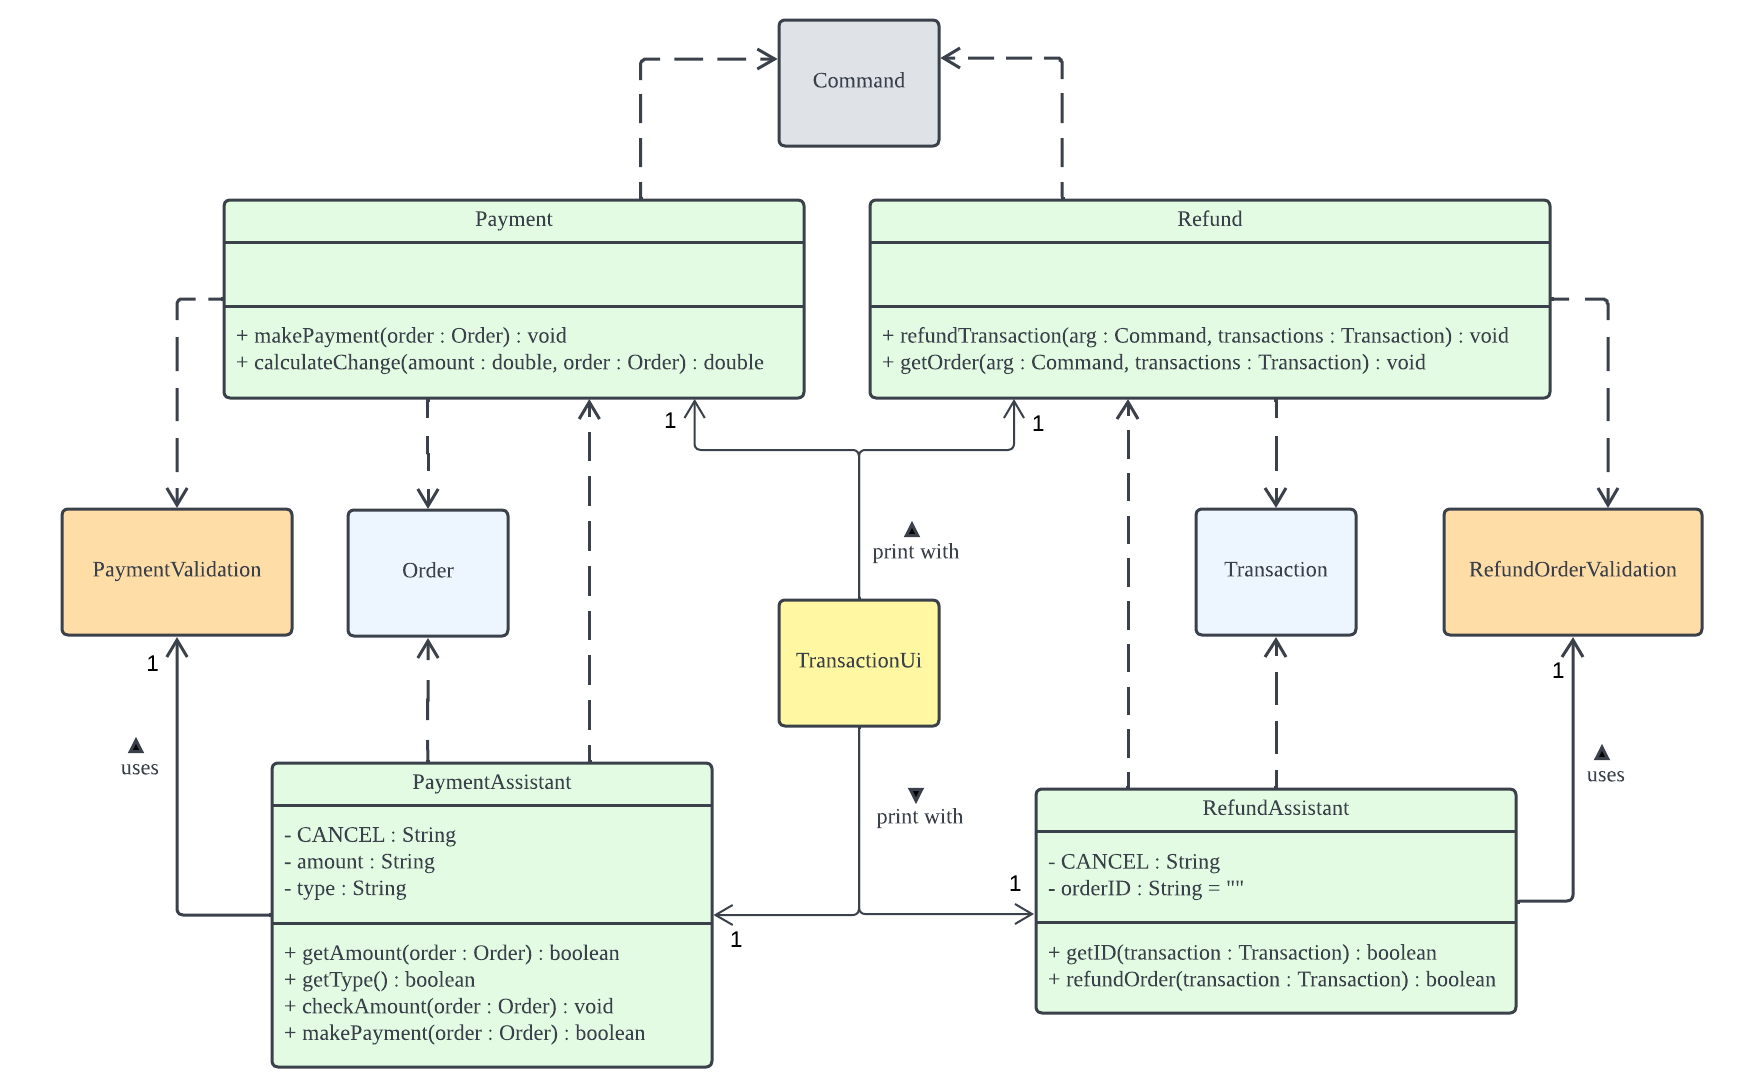
Figure 5: Class diagram for Payment component
The Payment component serves as an extension to the Transaction component. It enables updates to be made to the
status and payment type in the given Order object.
Whenever a pay or refund command is entered, the Router in the MoneyGoWhere component will pass the Command object
to the Payment component for further processing.
The Payment component comprises 4 main classes: Payment, Refund, PaymentAssistant and RefundAssistant.
When presented with both an Order object and the user-provided amount value, the Payment class takes care of
updating the order status and calculating the necessary change. This information is then displayed to the user through
the TransactionUi class.
The Refund class searches for the user-provided order-id in the Transaction object’s Order list. Once found, it
updates the status of that particular Order object.
The Validation component is utilised by both the Payment and Refund class to ensure the validity of all values
passed to its methods.
The PaymentAssistant and RefundAssistant classes provide an intuitive and user-friendly interface for users to
perform the above-mentioned functions. By leveraging on the TransactionUi class, these assistant classes offer a
guided experience for users.
Statistic Component
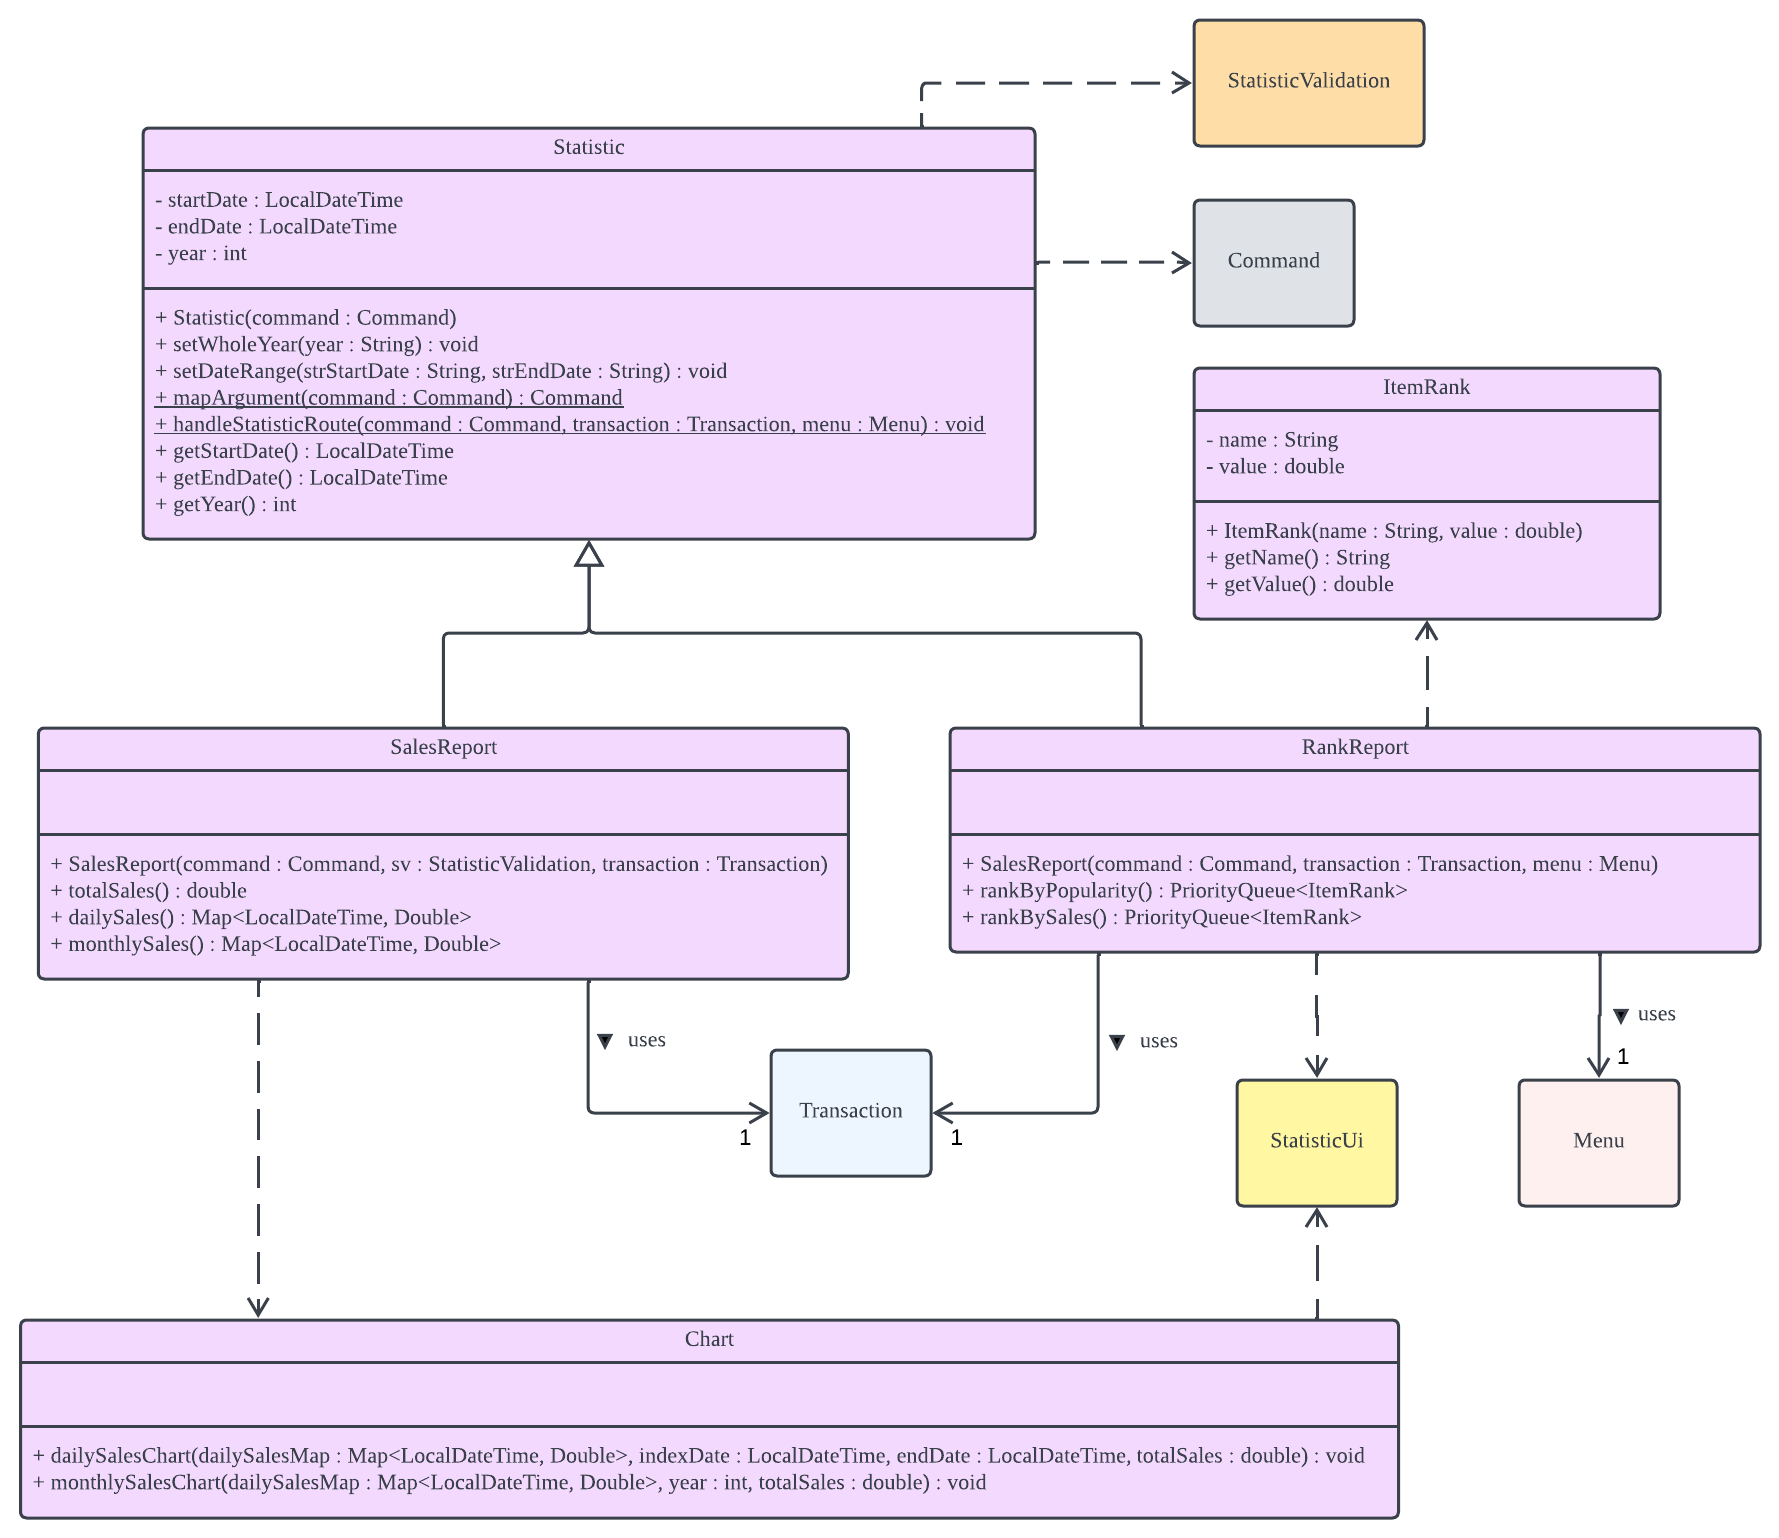
Figure 6: Class diagram for Statistic component
The Statistic component provides a reporting feature for MoneyGoWhere.
Whenever a report command is entered, the Router in the MoneyGoWhere component will pass the Command object to
the Statistic component for further processing.
The Payment component comprises 4 main classes: Statistic, SalesReport, RankReport, ItemRank, Chart
The Statistic class is a parent class for both SalesReport and RankReport classes.
When presented with both a Transaction object and the user-provided date range, the SalesReport class filters and
generates relevant sales-related reports based on the transactions within the date range.
The Chart class uses the StatisticUi class to generate an intuitive bar chart from the SalesReport object.
When presented with the Transaction object, the RankReport class ranks items in the Menu object based on quantity
sold or revenue made and display the results in a table using the StatisticUi class.
The ItemRank is a wrapper class that stores the name and values for the RankReport to compute the ranking of the
items.
The Validation component is utilised by the Statistic class and its children to ensure the validity of all values
passed to its methods.
Store Component
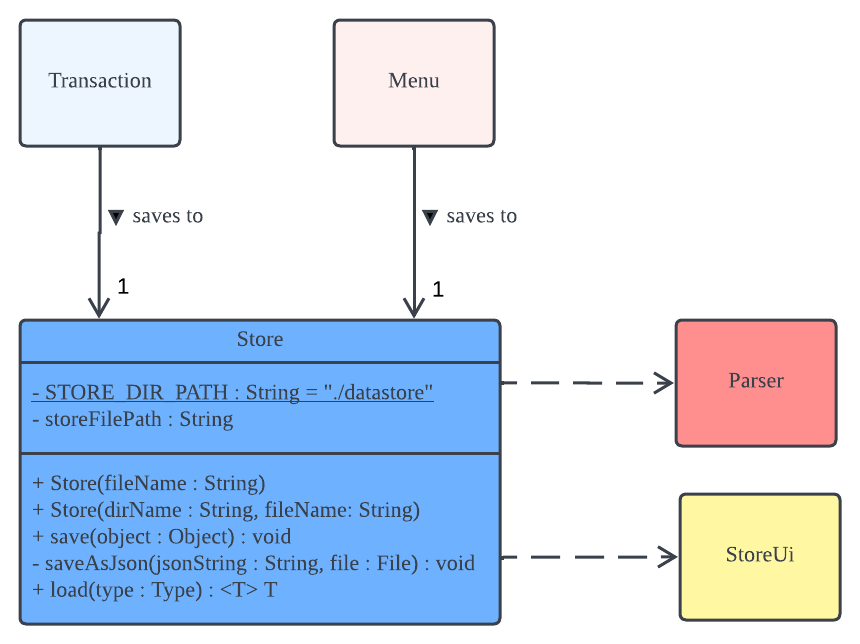
Figure 7: Class diagram for Store component
The Store class facilitates the saving and loading of both Transaction and Menu objects to and from
the ./datastore directory.
Both Transaction and Menu objects undergo JSON serialisation prior to being persisted to a file through
the Parser component.
The Parser component parses the JSON data retrieved from the file, converting it into either
a Transaction or Menu object.
Ui Component
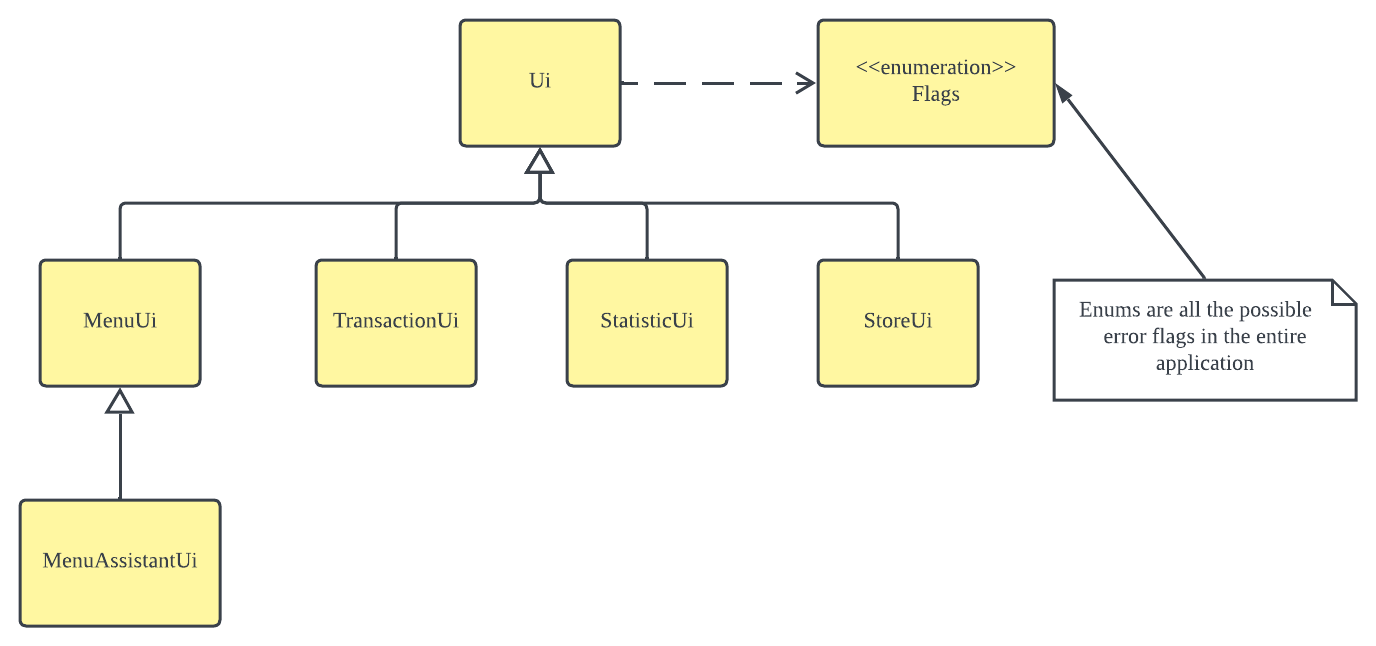
Figure 8: Class diagram for Ui component
The Ui component manages the process of gathering user input and displaying the application’s output to the user.
The Ui class encompasses all common Ui elements utilised throughout the MoneyGoWhere application, including the
essential function of accepting user input.
The MenuUi and MenuAssistantUi classes are responsible for menu-related Ui.
The TransactionUi class are responsible for order-related Ui.
The StatisticUi class are responsible for statistic-related Ui.
The StoreUi class are responsible for store-related Ui.
The Flag enumeration is a comprehensive collection of all error flags utilised throughout
the entirety of the MoneyGoWhere application.
Validation Component
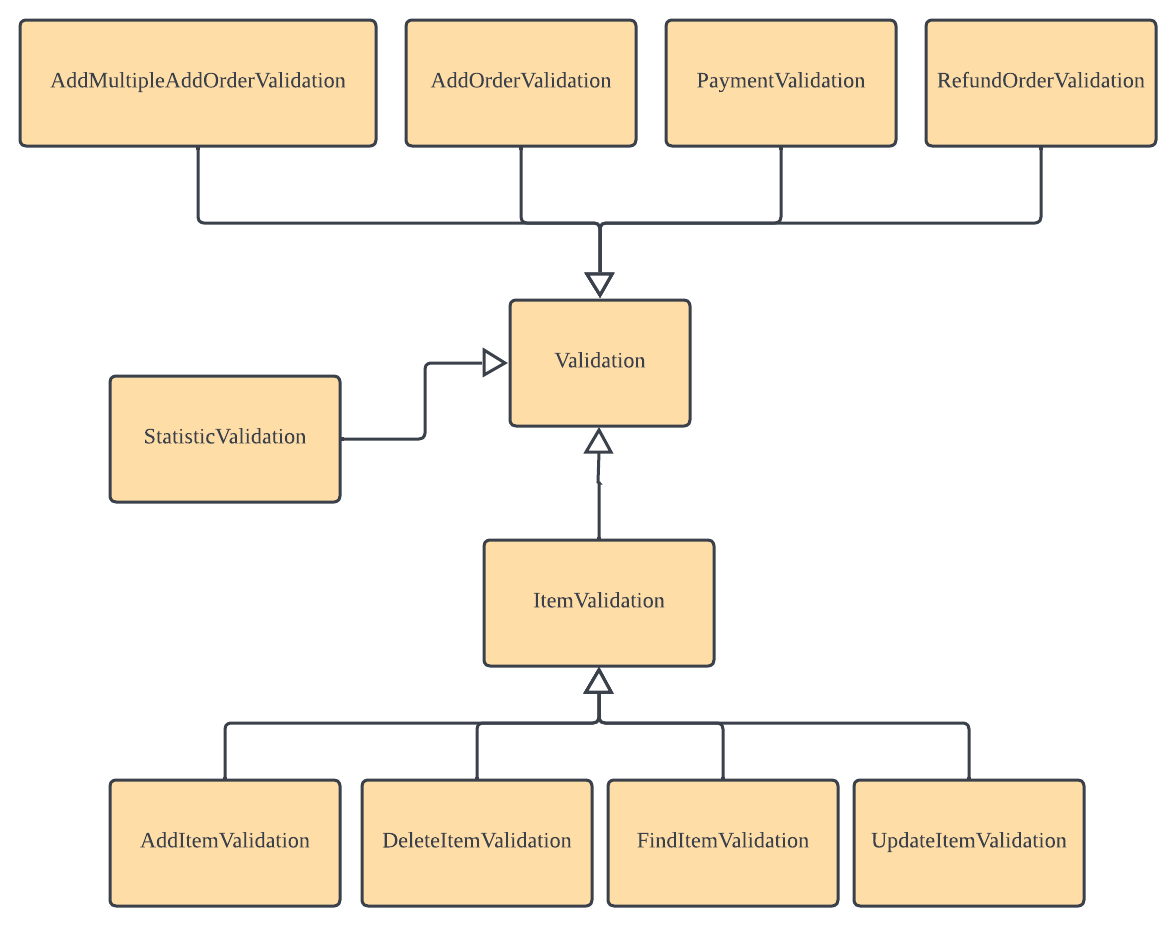
Figure 9: Class diagram for Validation component
The Validation component validates user input data before processing.
Each class within the Validation component is dedicated to validating a specific command.
Back to table of contents
Implementation
Item Commands
Overview
Add an Item
Experienced Mode Add an Item
The expected inputs to add only one menu item into an order is as such:
/additem -n <item_name> -p <price>
This sequence diagram models the interaction between various components in MoneyGoWhere when the user inputs the
command /additem.
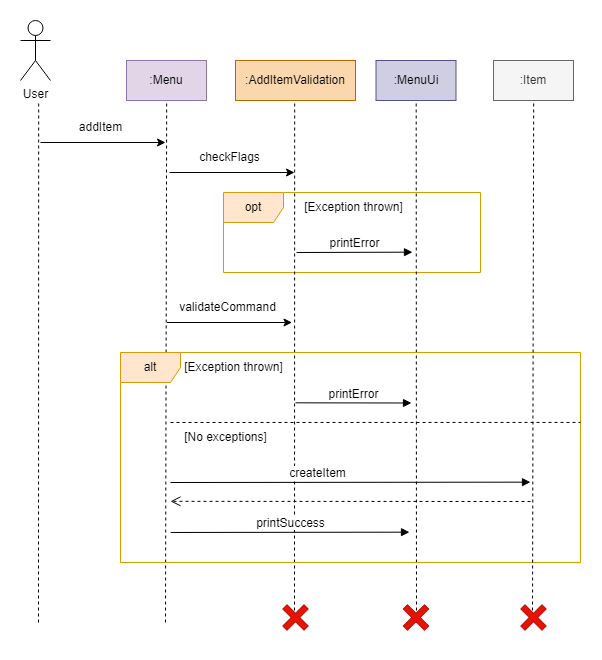
The general workflow of /additem is as follows:
- User input is passed to
MoneyGoWhere. MoneyGoWherethen creates a newCommandobject using the user input, whose constructor invokesParser#formatArgumentsmethod to extract the arguments for each flag into aMap.Router#handleRouteis then invoked to process the command and callsRouter#proRoutewhich invokesMenu#addItemmethod to run the/additemcommand.- Once the command runs,
Menu#addIteminvokesAddItemValidation#validateFlagsto check if all the required flags have been given.- If there are missing flags, a message indicating that the usage is invalid will be printed using
Ui#printlnand control is given back toMoneyGoWhere.
- If there are missing flags, a message indicating that the usage is invalid will be printed using
Menu#addItemthen invokesAddItemValidation#validateCommandwhich in turn, calls all the following validation method to check the arguments provided.AddItemValidation#validateArgumentchecks if the user inputStringis empty.- If the user input is empty, a message indicating that the input is empty is printed using
MenuUi#printErrorand control is given back toMoneyGoWhere.
- If the user input is empty, a message indicating that the input is empty is printed using
AddItemValidation#validateNamechecks if the given name is empty or exceeds the limit of 25 characters.- If the name violates these naming constraints, a message indicating that the name is too short or too long is
printed using
MenuUi#printErrorand control is given back toMoneyGoWhere.
- If the name violates these naming constraints, a message indicating that the name is too short or too long is
printed using
AddItemValidation#validateDuplicateNamechecks if the given name already exists in theArrayList<Item> itemsofMenu.- If the name already exists, a message indicating that the item name already exists is printed using
MenuUi#printErrorand control is given back toMoneyGoWhere.
- If the name already exists, a message indicating that the item name already exists is printed using
AddItemValidation#validatePricechecks if the given price is empty, is not a number, is negative or has more than 2 decimal points.- If any of the above is true, a message indicating the constraint that it has violated is printed using
MenuUi#printErrorand control is given back toMoneyGoWhere.
- If any of the above is true, a message indicating the constraint that it has violated is printed using
Menu#processAddItemis then invoked, and it creates a newItemobject using the name and price given. It then callsMenu#appendItemon the newItemobject to add it toArrayList<Item> itemsinMenu. Then,Menu#saveis invoked to save the changes to the local storage file.- The
Routerobject then callsMenuUi#printCommandSuccessto print a message indicating that the item has been successfully added to the menu.
New User Mode Add an Item
The expected inputs to add only one menu item into an order is as such:
additem1
The sequence diagram is similar to the Experienced Mode Add an Item.
The general workflow of additem is as follows:
MoneyGoWherecreates a newCommandobject using the user input, whose constructor invokes theParser#formatArgumentsmethod to extract the arguments for each flag into aMap.Router#handleRouteis then invoked to process the command and callsRouter#assistRoutewhich invokes theMenuAssistant#addItemmethod to run theadditemcommand.- Once the command runs, it can be aborted at any time before completion when the user inputs
/cancel. MenuAssistant#addIteminvokesMenuAssistant#getNameto get the name of the item to be added.MenuAssistant#getNamegets the name from the user and invokesAddItemValidation#validateNameto check if the given name is empty or exceeds the limit of 25 characters andAddItemValidation#validateDuplicateNameto check if the given name already exists in theArrayList<Item> itemsofMenu.- If the name violates these naming constraints, a message indicating that the name is too short or too long is
printed using
MenuUi#printErrorand re-prompts the user to enter a new name. - If the name already exists, a message indicating that the item name already exists is printed using
MenuUi#printErrorand re-prompts the user to enter a new name.
- If the name violates these naming constraints, a message indicating that the name is too short or too long is
printed using
MenuAssistant#addItemthen invokesMenuAssistant#getPriceto get the price of the item to be added.MenuAssistant#getPricegets the price from the user and invokesAddItemValidation#validatePriceto check if the given price is empty, is not a number, is negative or has more than 2 decimal points.- If any of the above is true, a message indicating the constraint that it has violated is printed using
MenuUi#printErrorand re-prompts the user to enter a new price.
- If any of the above is true, a message indicating the constraint that it has violated is printed using
- A new
Itemobject is then created using the name and price given by the user. Menu#appendItemis invoked on the newItemobject to add it toArrayList<Item> itemsinMenu.- Then,
Menu#saveis invoked to save the changes to the local storage file. Router#assistRoutethen callsMenuAssistant#printResultto print a message indicating that either the item has been successfully added to the menu, or the user has cancelled the command.
Back to table of contents
Delete an Item
Experienced Mode Delete an Item
The expected inputs to delete only one menu item into an order is as such:
/deleteitem -i <index>
This sequence diagram models the interaction between various components in MoneyGoWhere when the user inputs the
command /deleteitem.
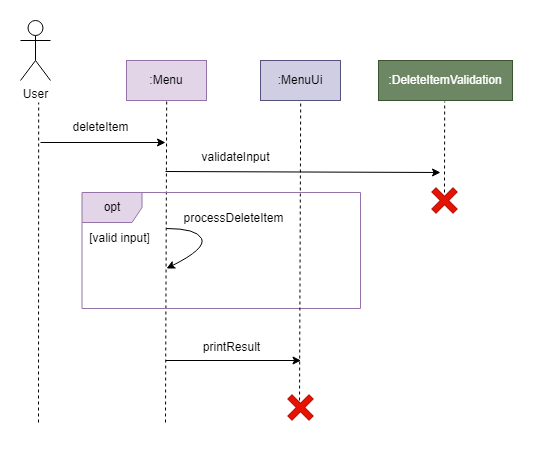
The general workflow of /deleteitem is as follows:
- User input is passed to
MoneyGoWhere. MoneyGoWherethen creates a newCommandobject using the user input, whose constructor invokesParser#formatArgumentsmethod to extract the arguments for each flag into aMap.Router#handleRouteis then invoked to process the command and callsRouter#proRoutewhich invokesMenu#deleteItemmethod to run the/deleteitemcommand.- Once the command runs,
Menu#deleteItemchecks if the list of items is empty. If empty, a message indicating that there is nothing to be deleted usingMenuUi#printErrorand control is given back toMoneyGoWhere. Menu#deleteIteminvokesDeleteItemValidation#validateFlagsto check if all the required flags have been given.- If there are missing flags, a message indicating that the usage is invalid will be printed using
MenuUi#printErrorand control is given back toMoneyGoWhere.
- If there are missing flags, a message indicating that the usage is invalid will be printed using
Menu#deleteItemthen invokesDeleteItemValidation#validateCommandwhich in turn, calls the following validation methods to check the arguments provided.DeleteItemValidation#validateArgumentchecks if the user inputStringis empty- If the user input is empty, a message indicating that the input is empty is printed using
MenuUi#printErrorand control is given back toMoneyGoWhere.
- If the user input is empty, a message indicating that the input is empty is printed using
DeleteItemValidation#validateIndexchecks if the given index is valid and exists- If the index is invalid, a message indicating the index does not exist is printed using
MenuUi#printErrorand control is given back toMoneyGoWhere.
- If the index is invalid, a message indicating the index does not exist is printed using
Menu#processDeleteItemis then invoked, and it callsMenu#removeItemon the given index to delete it from the list of items. Then,Menu#saveis invoked to save the changes to the local storage file.Routerobject then callsMenuUi#printCommandSuccessto print a message indicating that the item has been successfully added to the menu.
New User Mode Delete an Item
The expected inputs to delete only one menu item into an order is as such:
deleteitem2
The sequence diagram is similar to the Experienced Mode Delete an Item.
The general workflow of deleteitem is as follows:
MoneyGoWherethen creates a newCommandobject using the user input, whose constructor invokesParser#formatArgumentsmethod to extract the arguments for each flag into aMap.Router#handleRouteis then invoked to process the command and callsRouter#assistRoutewhich invokesMenuAssistant#deleteItemmethod to run thedeleteitemcommand.- Once the command runs, it can be aborted at any time when the user inputs
/cancel. MenuAssistant#deleteItemchecks if the list of items is empty. If empty, a message indicating that there is nothing to be deleted usingMenuUi#printErrorand control is given back toMoneyGoWhere.MenuAssistant#deleteIteminvokesMenuAssistant#getIndexto get the index of the item to be deleted.MenuAssistant#getIndexgets the index from the user and invokesDeleteItemValidation#validateIndexif the given index is valid and exists.- If the index is invalid, a message indicating the index does not exist is printed using
MenuUi#printErrorand re-prompts the user to enter a new index.
- If the index is invalid, a message indicating the index does not exist is printed using
Menu#removeItemis then invoked on the given index to delete it from the list of items. Then,Menu#saveis invoked to save the changes to the local storage file.Router#assistRoutethen callsMenuAssistant#printResultto print a message indicating that if the item has been successfully added to the menu or if the user has cancelled the command accordingly.
Back to table of contents
List all Items
The expected inputs to list all item is as such:
/listitemlistitem3
This sequence diagram models the interaction between various components in MoneyGoWhere when the user inputs any of the commands above.
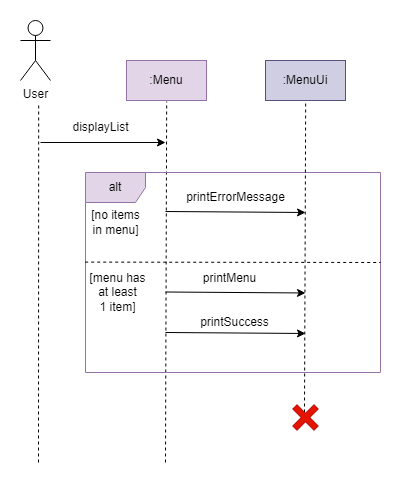
Note that the work flow for both Basic and Experienced Mode is the same.
The general workflow of /listitem is as follows:
MoneyGoWherethen creates a newCommandobject using the user input.Router#handleRouteis then invoked to process the command and callsRouter#assistRouteorRouter#proRoutewhich invokesMenuAssistant#displayListmethod to run the/listitemcommand.- The menu items list will be printed onto the console.
Back to table of contents
Update an Item
Experienced Mode Update an Item
The expected inputs to update only one menu item into an order is as such:
/updateitem -i <index> -n <name> -p <price>, where-n <name>and-p <price>are optional, but at least one of them must be present.
This sequence diagram models the interaction between various components in MoneyGoWhere when the user inputs the
command /updateitem.
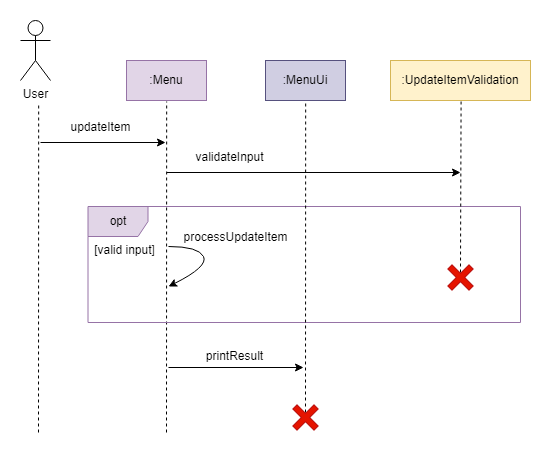
The general workflow of /updateitem is as follows:
- User input is passed to
MoneyGoWhere. MoneyGoWherethen creates a newCommandobject using the user input, whose constructor invokesParser#formatArgumentsmethod to extract the arguments for each flag into aMap.Router#handleRouteis then invoked to process the command and callsRouter#proRoutewhich invokesMenu#updateItemmethod to run the/updateitemcommand.- Once the command runs,
Menu#updateItemchecks if the list of items is empty. If empty, a message indicating that there is nothing to be updated is printed usingMenuUi#printErrorand control is given back toMoneyGoWhere. Menu#updateIteminvokesUpdateItemValidation#validateFlagsto check if all the required flags have been given.- If there are missing flags, a message indicating that the usage is invalid will be printed using
MenuUi#printErrorand control is given back toMoneyGoWhere.
- If there are missing flags, a message indicating that the usage is invalid will be printed using
Menu#addItemthen invokesUpdateItemValidation#validateCommandwhich in turn, calls the following validation methods to check the arguments, if they are provided.UpdateItemValidation#validateArgumentchecks if the user inputStringis empty- If the user input is empty, a message indicating that the input is empty is printed using
MenuUi#printErrorand control is given back toMoneyGoWhere.
- If the user input is empty, a message indicating that the input is empty is printed using
DeleteItemValidation#validateIndexchecks if the given index is valid and exists- If the index is invalid, a message indicating the index does not exist is printed using
MenuUi#printErrorand control is given back toMoneyGoWhere.
- If the index is invalid, a message indicating the index does not exist is printed using
AddItemValidation#validateNamechecks if the given name is empty or exceeds the limit of 25 characters- If the name violates these naming constraints, a message indicating that the name is too short or too long is
printed using
MenuUi#printErrorand control is given back toMoneyGoWhere.
- If the name violates these naming constraints, a message indicating that the name is too short or too long is
printed using
AddItemValidation#validateDuplicateNamechecks if the given name already exists in theArrayList<Item> itemsofMenu.- If the name already exists, a message indicating that the item name already exists is printed using
MenuUi#printErrorand control is given back toMoneyGoWhere.
- If the name already exists, a message indicating that the item name already exists is printed using
AddItemValidation#validatePricechecks if the given price is empty, is not a number, is negative or has more than 2 decimal points- If any of the above is true, a message indicating the constraint that it has violated is printed using
MenuUi#printErrorand control is given back toMoneyGoWhere.
- If any of the above is true, a message indicating the constraint that it has violated is printed using
Menu#processUpdateItemis then invoked and callsMenu#getItemwithMenu#setNameand/orMenu#setPriceon the given index to update its name and/or price. Then,Menu#saveis invoked to save the changes to the local storage file.Routerobject then callsMenuUi#printCommandSuccessto print a message indicating that the item has been successfully updated.
New User Mode Update an Item
The expected inputs to update only one menu item into an order is as such:
updateitem4
The sequence diagram is similar to the Experienced Mode Update an Item.
The general workflow of updateitem is as follows:
MoneyGoWherethen creates a newCommandobject using the user input, whose constructor invokesParser#formatArgumentsmethod to extract the arguments for each flag into aMap.Router#handleRouteis then invoked to process the command and callsRouter#assistRoutewhich invokesMenuAssistant#updateItemmethod to run theupdateitemcommand.- Once the command runs, it can be aborted at any time when the user inputs
/cancel. MenuAssistant#updateItemchecks if the list of items is empty. If empty, a message indicating that there is nothing to be updated usingMenuUi#printErrorand control is given back toMoneyGoWhere.MenuAssistant#updateIteminvokesMenuAssistant#getIndexto get the index of the item to be updated.MenuAssistant#getIndexgets the index from the user and invokesDeleteItemValidation#validateIndexto check if the given index is valid and exists.- If the index is invalid, a message indicating the index does not exist is printed using
MenuUi#printErrorand re-prompts the user to enter a new index.
- If the index is invalid, a message indicating the index does not exist is printed using
MenuAssistant#updateItemthen asks the user if the item’s name is to be updated.- If user indicates that the item’s name is to be updated,
MenuAssistant#getNameis invoked to get the name from the user and invokesAddItemValidation#validateNameto check if the given name is empty or exceeds the limit of 25 characters andAddItemValidation#validateDuplicateNameto check if the given name already exists in theArrayList<Item> itemsofMenu.- If the name violates these naming constraints, a message indicating that the name is too short or too long is
printed using
MenuUi#printErrorand re-prompts the user to enter a new name. - If the name already exists, a message indicating that the item name already exists is printed using
MenuUi#printErrorand re-prompts the user to enter a new name.
- If the name violates these naming constraints, a message indicating that the name is too short or too long is
printed using
MenuAssistant#updateItemthen asks the user if the item’s price is to be updated.- If user indicates that the item’s price is to be updated,
MenuAssistant#getPriceis invoked to get the price from the user and invokesAddItemValidation#validatePriceto check if the given price is empty, is not a number, is negative or has more than 2 decimal points- If any of the above is true, a message indicating the constraint that it has violated is printed using
MenuUi#printErrorand re-prompts the user to enter a new price.
- If any of the above is true, a message indicating the constraint that it has violated is printed using
Menu#getItemis then invoked withMenu#setNameand/orMenu#setpriceon the given index to update its name and/or price. Then,Menu#saveis invoked to save the changes to the local storage file.Router#assistRoutethen callsMenuAssistant#printResultto print a message indicating that if the item has been successfully updated or if the user has cancelled the command accordingly.
Back to table of contents
Find an Item
Experienced Mode Find an Item
The expected inputs to find any or all items that match the input is as such:
/finditem <"description">
This sequence diagram models the interaction between various components in MoneyGoWhere when the user inputs the
command /finditem.
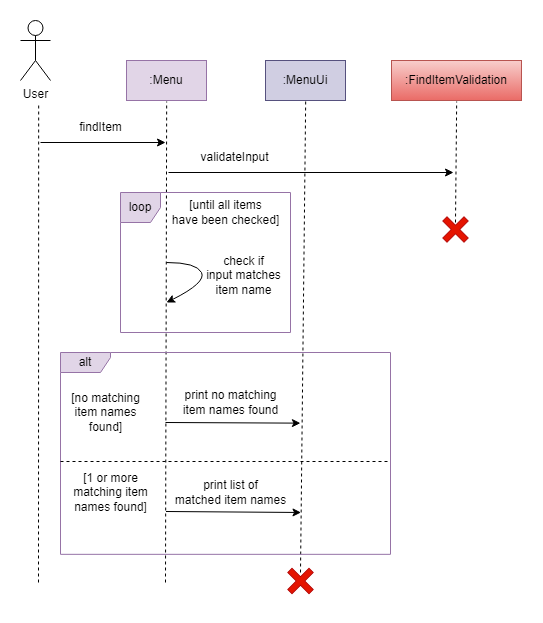
The general workflow of finditem is as follows:
MoneyGoWherethen creates a newCommandobject using the user input, whose constructor invokesParser#formatArgumentsmethod to extract the arguments for each flag into aMap.Router#handleRouteis then invoked to process the command and callsRouter#proRoutewhich invokesMenu#showResultsOffFindmethod to run the/finditemcommand.Menu#showResultsOffFindwill then instantiateFindItemValidationclass to call thevalidateNamemethod to ensure the item description is not empty.- If there is a matching result, the control will pass to
MenuUiclass to print the list of matched item names. - If there is no matching names found, the control will pass to
MenuUiclass to print no matching item names found.
New User Mode Find an Item
The sequence diagram is similar to the Experienced Mode Find an Item.
The general workflow of finditem is as follows:
MoneyGoWherethen creates a newCommandobject using the user input, whose constructor invokesParser#formatArgumentsmethod to extract the arguments for each flag into aMap.Router#handleRouteis then invoked to process the command and callsRouter#assistRoutewhich invokesMenuAssistant#showResultsOffFindmethod to run thefinditemcommand.- Once the command runs, it can be aborted at any time when the user inputs
/cancel. MenuAssistant#showResultsOffFindinvokesMenuAssistant#promptItemKeywordto get the description of the item to be searched.- It then calls the experienced search method
Menu#showResultsOfFindto search for the matching items. If there is matching result, the control will pass toMenuUiclass to print the list of matched item names. - If there is no matching names found, the control will pass to
MenuUiclass to print no matching item names found. Router#assistRoutethen callsMenuAssistant#printResultto print a message indicating that if the item has been successfully found or if the user has cancelled the command accordingly.
Back to table of contents
Order Commands
Overview
Add an Order
There are three ways to add an order into MoneyGoWhere.
- By adding only one menu item into an order.
- By adding one or more menu items into an order.
- By using New User Mode to add one or more menu items into an order.
All the ways work similarly, but are parsed differently.
This sequence diagram shows the interaction between various components in MoneyGoWhere when a user inputs commands to add an order.
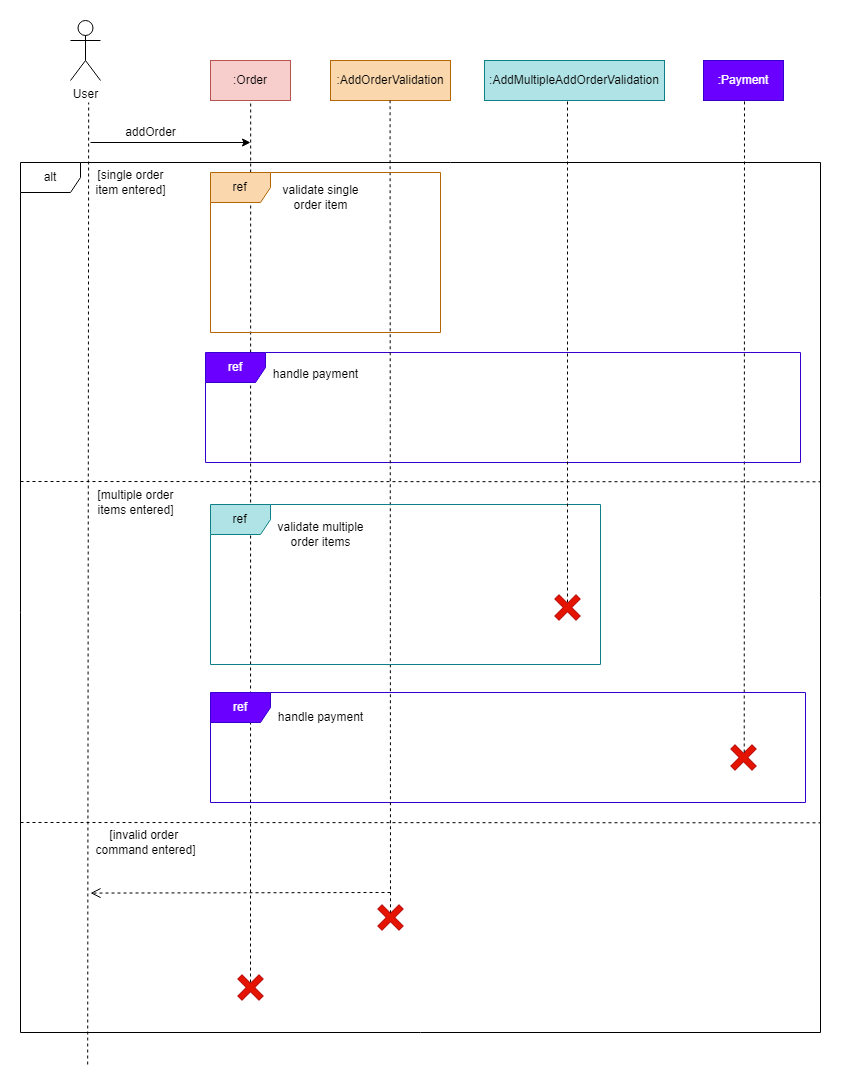
The next section will describe exactly how the inputs are parsed into the addorder command through each of the
described ways.
Add only one menu item into an order
The expected inputs to add only one menu item into an order is as such:
/addorder -i <item_index> -q <quantity>/addorder -i <substring_of_item_name> -q <quantity>/addorder --item <item_index> --quantity <quantity>/addorder --item <substring_of_item_name> --quantity <quantity>
This sequence diagram models the interaction between various components in MoneyGoWhere when the user inputs these commands.
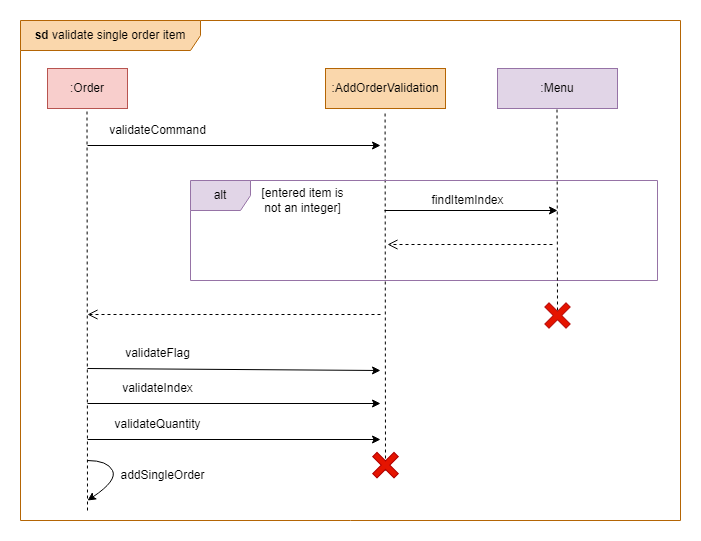
The general workflow of this /addorder command is as follows:
- User input is passed to
MoneyGoWhere. MoneyGoWherethen passes it to theCommandclass, which uses theParserclass to extract the command as/addorder.- The
/addordercommand gets passed back toMoneyGoWhereto check which method it should call. MoneyGoWherepasses the user input to theOrderclass to create anOrder.- The
Orderclass passes the user input to theAddOrderValidationclass for input validation. - If the input is invalid, the user will be shown an error message about the mistake made, and the correct format to enter the command will be shown.
- If the input is valid, a
Paymentobject will be created with the currentOrderas an input. - Once payment is made, the
Orderwill be passed to theTransactionsclass, where thisOrderwill be appended to the list ofTransactions.
Add multiple menu items into an order
The expected inputs to add multiple menu items into an order is as such:
/addorder -I [<item_index>:<quantity>,<substring_of_item_name>:<quantity>,...]/addorder -I [<substring_of_item_name>:<quantity>,<item_index>:<quantity>,...]/addorder --items [<item_index>:<quantity>,<substring_of_item_name>:<quantity>,...]/addorder --items [<substring_of_item_name>:<quantity>,<item_index>:<quantity>,...]
This sequence diagram models the interaction between various components in MoneyGoWhere when the user inputs the
command /addorder.
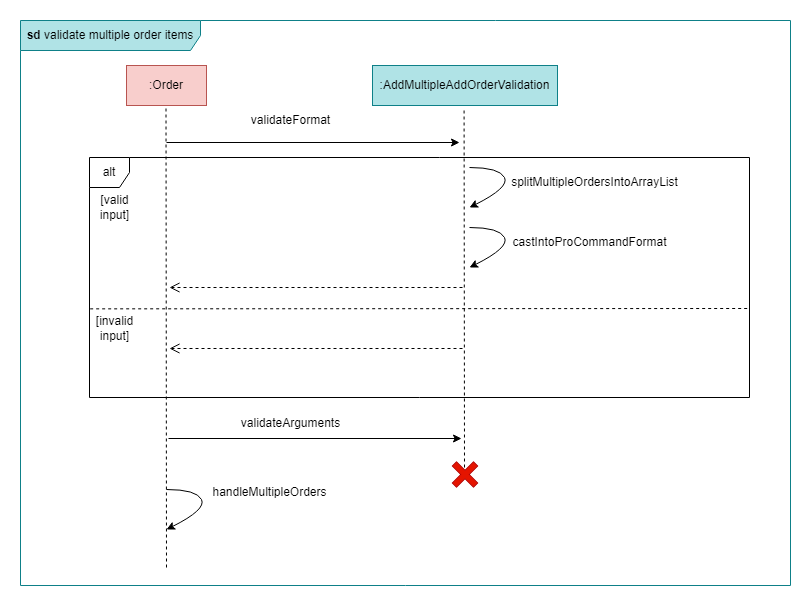
The general workflow of the /addorder command is as follows:
- User input is passed to
MoneyGoWhere MoneyGoWherethen passes it to theCommandclass, which uses theParserclass to extract the command as/addorder.- The
/addordercommand gets passed back toMoneyGoWhereto check which method it should call. MoneyGoWherecreates a newOrderobject and parses the user input into it as a parameter.- The
Orderclass passes the user input to theAddMultipleAddOrderValidationclass for input validation. - If the input is invalid, the user will be shown an error message about the mistake made, and the correct format to enter the command will be shown.
- If the input is valid, a
Paymentobject will be created with the currentOrderas an input. - Once payment is made, the
Orderwill be passed to theTransactionsclass, where thisOrderwill be appended to the list ofTransactions.
New User Mode Add an Order
This sequence diagram models the interaction between various components in MoneyGoWhere when the user inputs the
command addorder or 6.
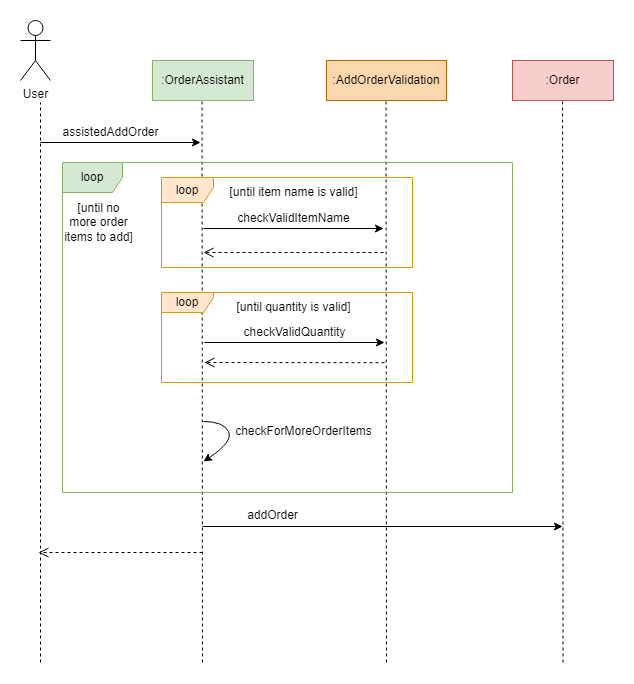
The general workflow of addorder is as follows:
- User input is passed to
MoneyGoWhere. MoneyGoWherethen passes it to theCommandclass, which uses theParserclass to extract the command asaddorder.- The
addordercommand gets passed back toMoneyGoWhereto check which function it should call. MoneyGoWherecalls theOrderAssistantclass’assistedAddOrdermethod, which continuously prompts the user for inputs with simple-to-follow instructions.- If the user enters “NO” when prompted for more items to add to the order, the entire input will be formatted into the valid format.
- The newly formatted input will be parsed into Advance Mode’s function to add multiple menu items into an order.
- Control will be returned to
MoneyGoWhereif the user cancels the order at any point when being prompted to add menu items into the order, or if the user enters “NO” when prompted, to complete the order.
Back to table of contents
Make payment
Experienced Mode Make Payment
This sequence diagram shows what happens after a valid add order command is executed.
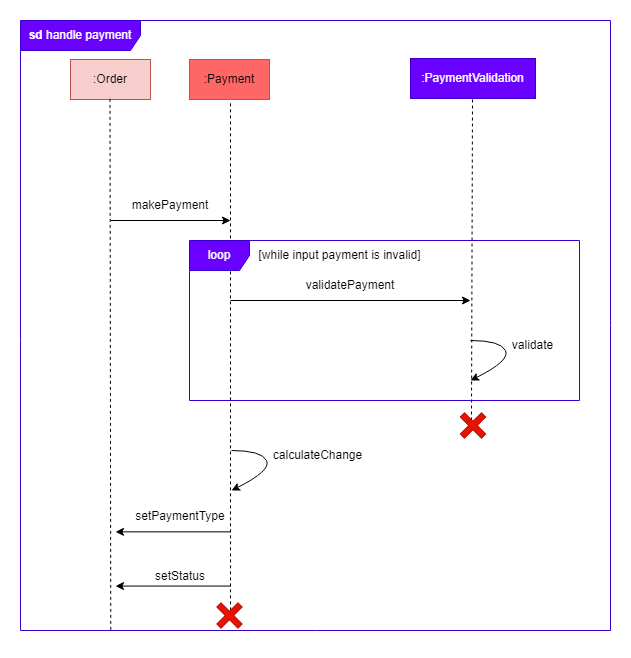
The general workflow of /pay is as follows:
- If the input is valid, a
Paymentobject will be created with the currentOrderas an input. - The
Paymentobject uses thehandlePaymentmethod to prompt the user to enter the/paycommand with the valid arguments. Payment#handlePaymentthen instantiates the validation classPaymentValidationto validate the arguments provided.- The method
PaymentValidation#validatePaymentis invoked to check the following:- The correct command format is used.
- The flag for payment type and amount flags are present.
- If the payment type is by card, the payment amount must be exact.
- The payment amount is a valid 2 decimal place double and must be more than or equals to the subtotal of the order.
- If the command passes all the validation checks, control is given back to
Paymentclass and theOrder.statuswill be updated tocompleted, and the payment type and amount are also updated accordingly and is saved to theorders.jsonfile using theTransaction#savemethod. - Lastly, the control will be given back to the
Routerclass, and it then invokes theUi#printCommandSuccessto print a message indicating that the command has executed successfully.
New User Mode Make Payment
The sequence diagram is similar to Experienced Mode Make Payment.
The general workflow of pay is as follows:
- If the input is valid, a
Paymentobject will be created with the currentOrderas an input. - The
Paymentobject uses thehandlePaymentmethod to prompt the user to enter thepaycommand. Payment#handlePaymentthen instantiates the assistant classPaymentAssistantand invoke itsmakePaymentmethod.- The method
PaymentAssistant#makePaymentis invoked to check the following:- If the user enters
/cancel, abort the command and return the control toRouterclass. - The
getAmountandgetTypemethods are called to prompt user to enter the payment amount and type, then calls thePaymentValidationclass to validate the input:- If the payment type is by card, the payment amount must be exact.
- The payment amount is a valid 2 decimal place double and must be more than or equals to the subtotal of the order.
- If the user enters
- If the command passes all the validation checks, control is given back to
PaymentAssistantclass and theOrder.statuswill be updated tocompleted, the payment type and amount are also updated accordingly and is saved to theorders.jsonfile using theTransaction#savemethod. - Lastly, the control will be given back to the
Routerclass, and it then invokes theUi#printCommandSuccessto print a message indicating that the command has executed successfully.
Back to table of contents
List all Orders
This sequence diagram models the interaction between various components in MoneyGoWhere when the user inputs the
command /listorder.
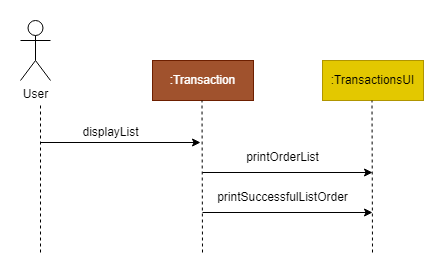
Note that the work flow for both Basic and Experienced Mode is the same, and if the user input is 7 or listorder.
The general workflow of /listorder is as follows:
- User input is passed to
MoneyGoWhere. MoneyGoWherethen passes it to theCommandclass, which uses theParserclass to extract the command aslistorder.- The obtained command is then passed back to
MoneyGoWhere, which calls thedisplayListmethod in theTransactionsobject that was initialized alongsideMoneyGoWhere. - The transactions will be printed onto the console.
Back to table of contents
Refund an Order
Experienced Mode Refund an Order
This sequence diagram models the interaction between various components in MoneyGoWhere when the user inputs the
command /refundorder.
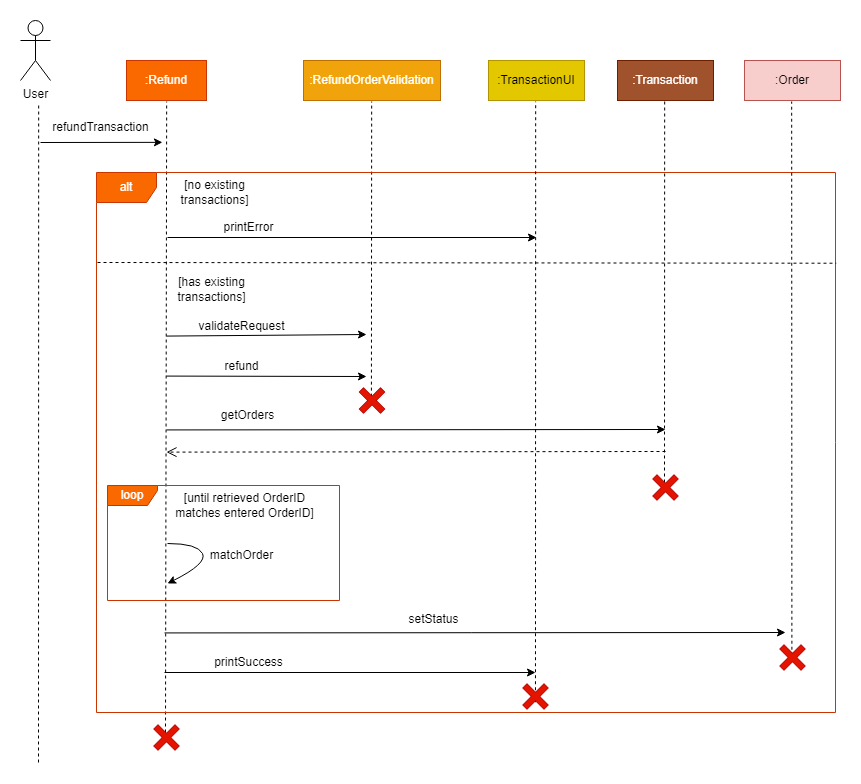
The general workflow of /refundorder is as follows:
- User input is passed to
MoneyGoWhere.MoneyGoWherethen passes it to theCommandclass, which instantiates a newParserobject to extract the command as/refundorder. - The
Parserobject then usesParser#formatInputmethod fromParserclass to extract all the arguments from the user input. Router#handleRouteis then invoked to process the command. It calls theRouter#proRoutefor the experienced mode commands.- The obtained command
refundorderis then passed back toMoneyGoWhere, which instantiates a newRefundobject and calls theRefund#refundTransactionmethod. Refund#refundTransactionthen instantiates the validation classrefundOrderValidation. The methodrefundOrderValidation#validateRefundOrderis invoked to validate the arguments provided.refundOrderValidation#checkArgumentchecks if the required argument is present. The expected argument is theOrder.UUID.refundOrderValidation#checkOrderfirst check if the argument is indeed a validOrder.UUIDthen checks theOrder.status.- If the
Order.statusis alreadyrefunded, then the command would be invalid.
- If the
- If the command passes all the validation checks, control is given back to
Refundclass and theOrder.statuswill be updated torefundedand is saved to theorders.jsonfile using theTransaction.savemethod. - Lastly, the control will be given back to the
Routerclass, and it then invokes theUi#printCommandSuccessto print a message indicating that the command has executed successfully.
New User Mode Refund an Order
The sequence diagram is similar to the Experienced mode Refund an Order.
The general workflow of refundorder is as follows:
- User input is passed to
MoneyGoWhere.MoneyGoWherethen passes it to theCommandclass, which instantiates a newParserobject to extract the command asrefundorder. - The
Parserobject then usesParser#formatInputmethod from Parser class to extract all the arguments from the user input. Router#handleRouteis then invoked to process the command. It calls theRouter#assistRoutefor the new user mode commands.- Once the command runs, it can be aborted at any time when the user inputs
/cancel. - The obtained command
refundorderis then passed back toMoneyGoWhere, which instantiates a newRefundAssistantobject and calls theRefundAssistant#refundOrdermethod. RefundAssistant#refundOrderinvokes thegetIDmethod to get and validate the order ID to be refunded.- If the order list is empty, the command would be invalid.
- If the order ID is invalid, the command would be invalid.
- If the command passes all the validation checks, control is given back to
Refundclass and theOrder.statuswill be updated torefundedand is saved to theorders.jsonfile using theTransaction#savemethod. Router#assistRoutethen callsMenuAssistant#printResultto print a message indicating that if the item has been successfully added to the menu or if the user has cancelled the command accordingly.
Back to table of contents
Report Commands
Overview
Statistics
This sequence diagram models the overview of the statistic components when the user inputs the command \report.
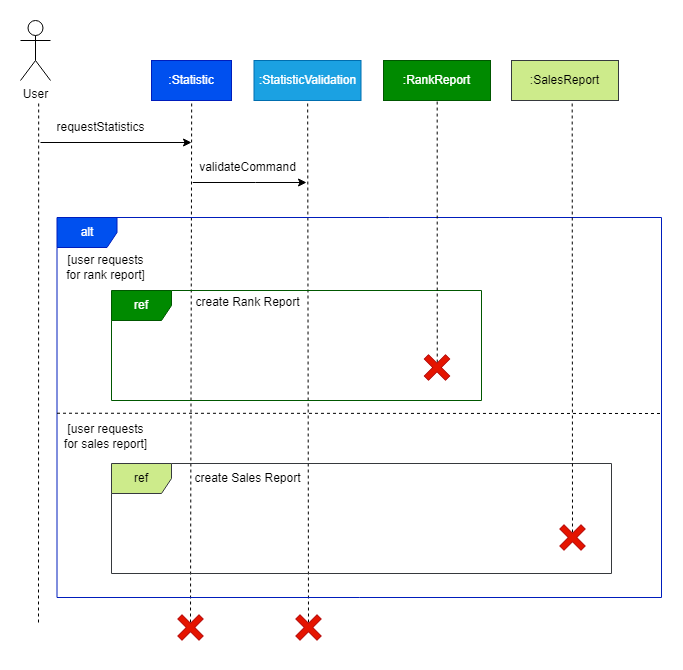
Generate sales report
This sequence diagram models the interaction between various components in MoneyGoWhere when the user inputs the command
/report -s <type> {-y <year>} {-f <start-date> -t <end-date>}, where of the following:
- The type of
-sis eitherdailyormonthly. - Only one of
-y <year>or-f <start-date> -t <end-date>must be present.- If the option
-s monthlyis used,-y <year>must be present.
- If the option
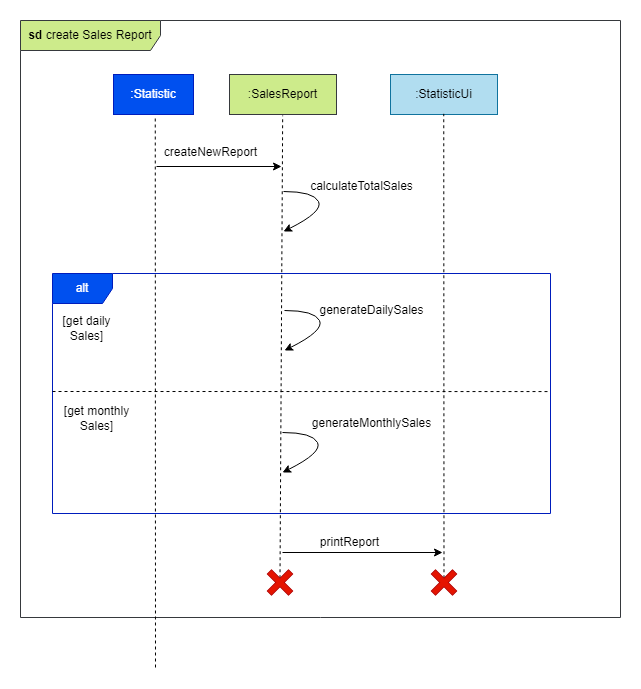
The general workflow of /report -s <type> {-y <year>} {-f <start-date> -t <end-date>} is as follows:
- User input is passed to
MoneyGoWhere.MoneyGoWherethen passes it to theCommandclass, which instantiates a newParserobject to extract the command as/report. - The
Parserobject then usesparser#formatInputmethod fromParserclass to extract all the arguments from the user input. Router#handleRouteis then invoked to process the command and callsRouter#proRoutewhich invokesStatistic#handleStatisticRoutemethod to run the/reportcommand.- It then instantiates the validation class
StatisticValidationand invokes thevalidateRequiredFlagmethod. This validates the user input to contain all the required flags, in the correct format. - Once the input is validated, it is passed to instantiate the
SalesReportclass. - The
totalSalesmethod is then invoked to calculate the subtotal of all the completed orders. - If the user input is
daily,Chartclass is instantiated and calls thedailySalesChartto generate the bar charts based off daily sales. - If the user input is
monthly,Chartclass is instantiated and calls themonthlySalesChartto generate the bar charts based off monthly sales. - Lastly, the control will be given back to the
MoneyGoWhereclass to prompt for new user input.
Back to table of contents
Generate rank report
This sequence diagram models the interaction between various components in MoneyGoWhere when the user inputs the command
/report -r <type> {-y <year>} {-f <start-date> -t <end-date>}
- The type for
-ris eithersalesorpopular. - Only one of
-y <year>or-f <start-date> -t <end-date>must be present.- If the option
-s monthlyis used,-y <year>must be present.
- If the option
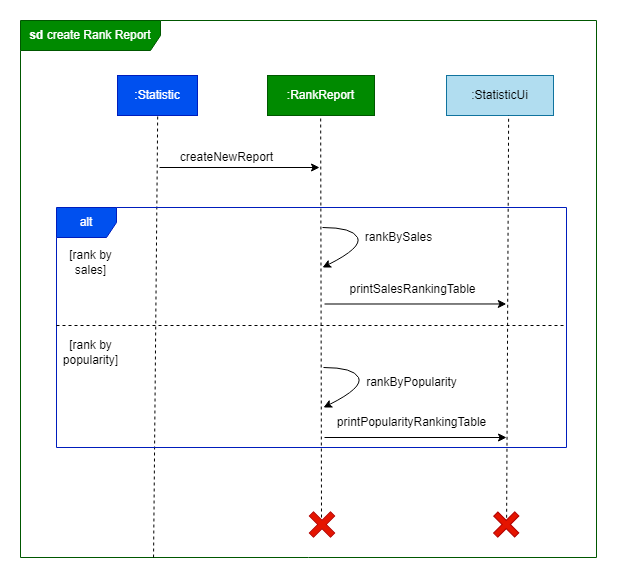
The general workflow of /report -r <type> {-y <year>} {-f <start-date> -t <end-date>} is as follows:
- User input is passed to
MoneyGoWhere.MoneyGoWherethen passes it to theCommandclass, which instantiates a newParserobject to extract the command as/report. - The
Parserobject then usesparser#formatInputmethod fromParserclass to extract all the arguments from the user input. Router#handleRouteis then invoked to process the command and callsRouter#proRoutewhich invokesStatistic#handleStatisticRoutemethod to run the/reportcommand.- It then instantiates the validation class
StatisticValidationand invokes thevalidateRequiredFlagmethod. This validates the user input to contain all the required flags in the correct format. - If the user input is
sales, therankBySalesmethod is invoked to rank the menu items according to total order sales.- The
StatisticUi#printSalesRankingTableis called to print the ranking table to the console.
- The
- If the user input is
popular, therankByPopularitymethod is invoked to rank the menu items according to total number of order quantities.- The
StatisticUi#printPopularityRankingTableis called to print the ranking table to the console.
- The
- Lastly, the control will be given back to the
MoneyGoWhereclass to prompt for new user input.
Back to table of contents
Requirements
Project Scope
Target user profile
Our target user profile is the NUS canteen hawker owners.
- Canteen operators looking to streamline their operations and improve efficiency.
- Familiar with basic computer usage and is able to type fast.
- Concerned about the cost of traditional point-of-sale (POS) systems and looking for a more affordable and flexible solution.
Value Proposition
MoneyGoWhere is a comprehensive and easy-to-use CLI application designed to simplify canteen operations and streamline business processes. With its robust features, including menu management, payment processing, and sales statistics generation, MoneyGoWhere is an ideal solution for canteens of any size.
Back to table of contents
User Stories
| Version | As a… | I want to… | So that I can… |
|---|---|---|---|
| v1.0 | Hawker Store Owner | Add an item | Add it to an order in the future |
| v1.0 | Hawker Store Owner | Delete an item | Remove it from the menu |
| v1.0 | Hawker Store Owner | List all items | View all items in the menu, including its index and price |
| v1.0 | Hawker Store Owner | Add an item to an order | Track what customers order and calculate its total cost |
| v1.0 | Hawker Store Owner | Add multiple items to an order | Save time by combining multiple items from a single customer into one order |
| v1.0 | Hawker Store Owner | List orders | See all orders, including the total cost of each other |
| v1.0 | Returning User | Save menu items | Save time by using the same menu, without entering each item over again each day |
| v1.0 | Returning User | Save transactions from previous days | Keep track of all orders easily, even across multiple days |
| v1.1 | Hawker Store Owner | Search for an item | Check its index or price |
| v1.1 | Hawker Store Owner | Add items to an order by name | Add items without remembering its index |
| v2.0 | Hawker Store Owner | Void an order | Provide refunds or ignore orders with wrong inputs |
| v2.0 | New User | Add an item step-by-step | Get used to the new system |
| v2.0 | New user | Delete an item step-by-step | Get used to the new system |
| v2.0 | New User | Add an item(s) to an order step-by-step | Get used to the new system |
| v2.0 | Returning User | See statistics on based on previous transactions | Obtain statistics about my various items for sale |
Back to table of contents
Non-functional Requirements
- The application should be able to run on any operating system with
Java 11installed. - The application should be responsive.
- The application should be simple enough for a novice who is not familiar with a Command Line Interface (CLI) to use.
- The application should be easily adaptable to people who are already well-versed in using a traditional POS system.
Back to table of contents
Glossary
The glossary is shown in alphabetical order. If you have any additional questions, please reach out to our team.
| Term | Explanation | |
|---|---|---|
| Flag | Used to specify instructions and change the behaviour of a command. In this application, flags have a short-form and a long-form, ie. -n and --name. |
|
| Parser | A Parser is responsible for making sense of the user inputs and processing them as commands for the application to run. | |
| Storage | A Storage is in charge of saving and reading to and from the save file respectively. | |
| Ui | A UI is an user interface that the user sees on the CLI. |
Back to table of contents
Appendix
Instructions for manual testing
Below are some instructions to test MoneyGoWhere manually.
These instructions only provide a starting point for testers to work on; testers are free to do more exploratory testing.
Overview
- Launch and Shutdown
- Menu Testing
- Order Testing
- Payment Testing
- Refund testing
- Statistic Testing
- Storage Testing
Launch and shutdown
Initial launch
1. Ensure that Java 11 or above is installed.
2. Download the latest .jar version of MoneyGoWhere from [here](https://github.com/AY2223S2-CS2113T-T09-2/tp/releases/tag/v2.1).
3. Copy the file to the folder you wish to use as a home folder for MoneyGoWhere.
4. Open a terminal and navigate to the folder.
5. Start the application by executing java -jar MoneyGoWhere.jar in the terminal.
6. Once MoneyGoWhere has successfully launched a welcome message should appear.
7. When launched for the first time, a folder will be created for file storage.
Shutting down
1. Quit the application using the command `exit`.
2. MoneyGoWhere prints a farewell message before terminating.
Back to table of contents
Menu Testing
Adding a menu item
Adding an item when menu is empty.
1. Test case: `/additem -n "chicken rice" -p 3.50`

   Expected: Item added successfully.

2. Test case: `/additem -n "duck rice" -p three dollars`

   Expected: Item is not added to the menu. An error message is displayed along with the reason:
   Price must be a number.

3. Other incorrect add commands to test: `/additem`, `/additem "name"`, `/additem -n "name"` and `/additem -p 2.50`
Adding an item when menu is not empty.
1.  Test case: `/additem -n "chicken rice" -p 3.50`

  Expected: Item is not added to the menu. An error message is displayed along with the reason:
  Name already exists. Please choose a different name.
Deleting a menu item
Deleting an item when menu is empty.
1. Test case: `/deleteitem -i 1`

   Expected: Item is not deleted. An error message is displayed along with the reason:
   There are no items on the menu
Deleting an item when menu is not empty.
1.  Test case: `/deleteitem -i 1`

  Expected: Item at index 1 is deleted successfully.

2. Test case: `/deleteitem -i 999`

   Expected: Item is not deleted. An error message is displayed along with the reason:
   Index does not exist

3. Other incorrect commands to test: `/deleteitem`, `/deleteitem something`, `/deleteitem -i` and `/deleteitem -i something`
Updating a menu item
Updating an item when menu is empty.
1. Test case: `/updateitem -i 1 `

   Expected: Item is not updated. An error message is displayed along with the reason:
   Index does not exist.
Updating an item when menu is not empty.
1.  Test case: `/updateitem -i 1 -p 5.50`

  Expected: Item at index 1 is updated successfully.

2. Test case: `/updateitem -i 2 -n "new name"`

   Expected: Item at index 2 is updated successfully.
3. Test case: `/updateitem -i 2 -p "something"`

   Expected: Item is not updated. An error message is displayed along with the reason:
   Price must be a number.
4. Other incorrect commands to test: `/updateitem`, `/updateitem something`, `/updateitem -i` and `/updateitem -i 1`
Finding a menu item
Finding an item when menu is empty.
1. Test case: `/finditem "something"`

   Expected: No menu items matching something were found.
Finding an item when menu is not empty.
1.  Test case: `/finditem "rice"`

  Expected: All items that contain "rice" in its names will be displayed.

2. Test case: `/finditem`

   Expected: Command is not valid. An error message is displayed along with the reason:
   Please specify the keyword to search for.
List items
Menu list is empty
1. Test case: `listitem`

   Expected: There are no items on the menu
Menu list is not empty
1. Test case: `listitem`

   Expected: All the menu items are listed

2. Test case: `listitem something`
   Expected: Command is not recognised
Back to table of contents
Order Testing
Adding an order
Add single order.
1. Test case: `/addorder -i 1`

   Expected: Subtotal: $3.00. Order has been added successfully.
   Please use /pay -a <amount> -t <type> or pay to make payment.

2. Test case: `/addorder -i 2 -q 10`

   Expected: Subtotal: $34.50. Order has been added successfully.
   Please use /pay -a <amount> -t <type> or pay to make payment.

3. Test case: `/addorder -i 999`

   Expected: Order is not added. An error message is displayed along with the reason:
   Index does not exist.

4. Other incorrect add commands to test: `/addorder`, `/addorder -i something` and `/addorder -i 1 -q name`
Add multiple orders.
1. Test case: `/addorder -I [1:1]`

   Expected: Subtotal: $3.00. Order has been added successfully.
   Please use /pay -a <amount> -t <type> or pay to make payment.

2. Test case: `/addorder -I [1:2,2:3]`

   Expected: Subtotal: $16.35. Order has been added successfully.
   Please use /pay -a <amount> -t <type> or pay to make payment.

3. Test case: `/addorder -I [999:1]`

   Expected: Order is not added. An error message is displayed along with the reason:
   Index does not exist.

4. Other incorrect add commands to test: `/addorder -I`, `/addorder -I [something]` and `/addorder -I [something:something]`
List orders
Order list is empty
1. Test case: `listorder`

   Expected: Order list is empty.
Order list is not empty
1. Test case: `listorder`

   Expected: All transactions are listed
2. Test case: `listorder something`
   Expected: Command is not recognised
Back to table of contents
Payment testing
Paying an order
Test case:
Subtotal: $30.00. Order has been added successfully. Please use /pay -a
-t or pay to make payment.
1. Test case: `/pay -a 40 -t cash`

   Expected: The calculated change is $10.00. Order has been paid.

2. Test case: `/pay -a 20 -t cash`

   Expected: Order is not completed. An error message is displayed along with the reason:
   Insufficient amount. Payment amount must be more than or equals to subtotal.

3. Test case: `/pay -a 50 -t card`

   Expected: Order is not completed. An error message is displayed along with the reason:
   Please input exact amount for card payment.

4. Other incorrect commands to test: `/pay 40`, `/pay -a thirty`, `/pay -a 10 -t 10` and `/pay -t cash`
Back to table of contents
Refund testing
Refunding an order
Refund an order when order list is empty.
1. Test case: `/refundorder -i 204vfenefnef03nf0`

   Expected: Command is not valid. An error message is displayed along with the reason:
   There is no order to refund.
Refund an order when order list is not empty.
1. Test case: `/refundorder -i b0d70428-c5b2-4024-82e9-ce77cf89dc0c`

   Expected: The order's status is now refunded.

2. Test case: `/refundorder -i 2b9262ce-e1db-4e31-9b8e-c9e149669d35`

  Expected: Order is not refunded. An error message is displayed along with the reason:
  Order is already refunded.

3. Test case: `/refundorder -i some39399thing`

  Expected: Order is not refunded. An error message is displayed along with the reason:
  Invalid order ID.
Back to table of contents
Statistic testing
Rank by sales
1. Test case: `/report -s daily -y 2023`

   Expected: The chart table is displayed to show all the sales in the year of 2023, grouped by each day.

2. Test case: `/report -s monthly -y 2023`

   Expected: The chart table is displayed to show all the sales in the year of 2023, grouped by each month.

3. Test case: `/report -s weekly -y 2023`

   Expected: Command is not recognised. An error message is displayed along with the reason:
   Report type specified in [-r|--rank] or [-s|--sales] option not recognised.

4. Other incorrect commands to test: `/report`, `/report -s` and `/report -s yearly`
Rank by popularity
1. Test case: `/report -r sales -y 2023`

   Expected: The chart table is displayed to rank items by sales in the year of 2023.

2. Test case: `/report -r popular -y 2023`

   Expected: The chart table is displayed to rank items by popularity in the year of 2023.

3. Test case: `/report -r sales -y monthly`

   Expected: Command is not recognised. An error message is displayed along with the reason:
   Year format provided in [-y|--year] is/are not recognised

4. Other incorrect commands to test: `/report`, `/report -r` and `/report -r something`
Back to table of contents
Storage Testing
MoneyGoWhere.jar is placed in a location where read and write permissions are given.
1. Test case: First time launched

   Expected: Datastore folder will be created for menu.json and orders.json file.

2. Test case: File is corrupted
   Expected: The application will detect it as a corrupted file, correct the format and restore the data.
MoneyGoWhere.jar is placed in a location with no read and write permissions
1. Test case: First time launched

   Expected: No files are created and saved. Error message is displayed.
Back to table of contents
Final Comments
If you have read until the end, thank you! We hope you have understood the inner mechanisms of MoneyGoWhere, and that you had a relatively easy time reading through this Developer Guide.
We (the original MoneyGoWhere team) put in a considerable amount of effort to make the guide as detailed and correct as possible. We hope that the information in this guide will be useful in improving MoneyGoWhere, and we look forward to seeing it being continuously loved and improved upon.
Once again, thank you for reading the guide!